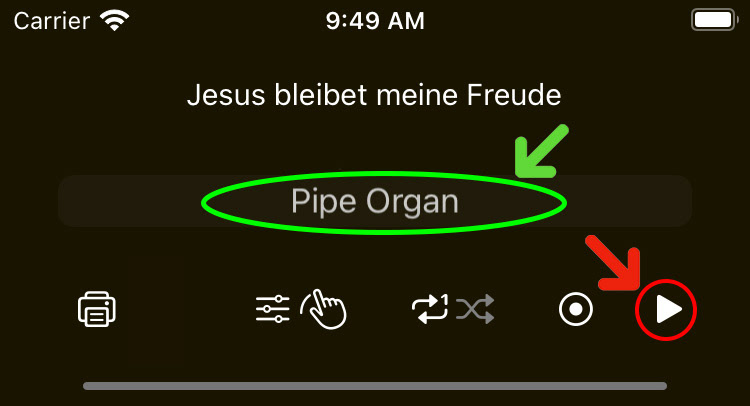
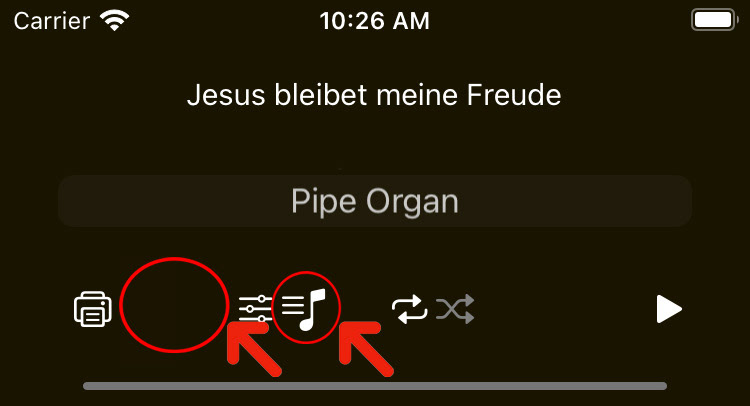
1.さあ始めましょう。まずは、アイコンをタップ。
1. Let's start. First, tap the icon.
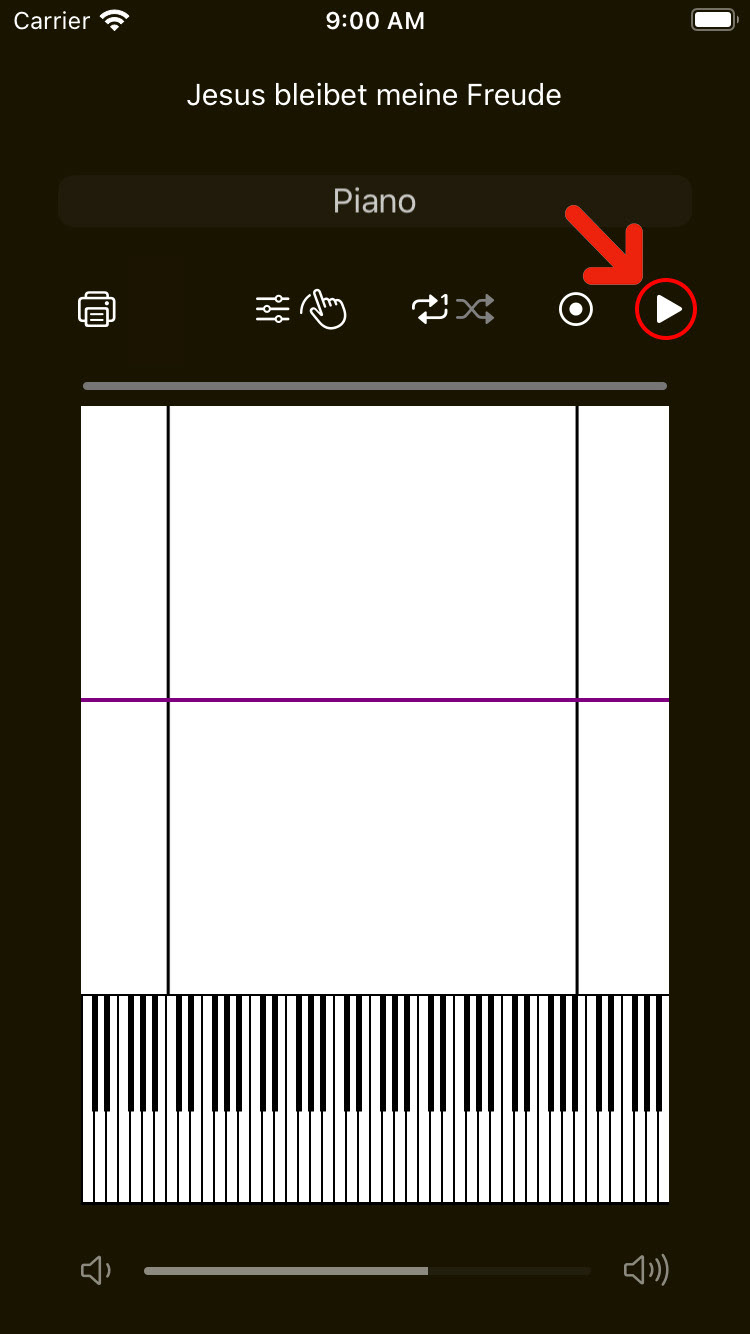
2.次は演奏ボタンをタップ。
2. Next, tap the Play button.
2. Next, tap the Play button.
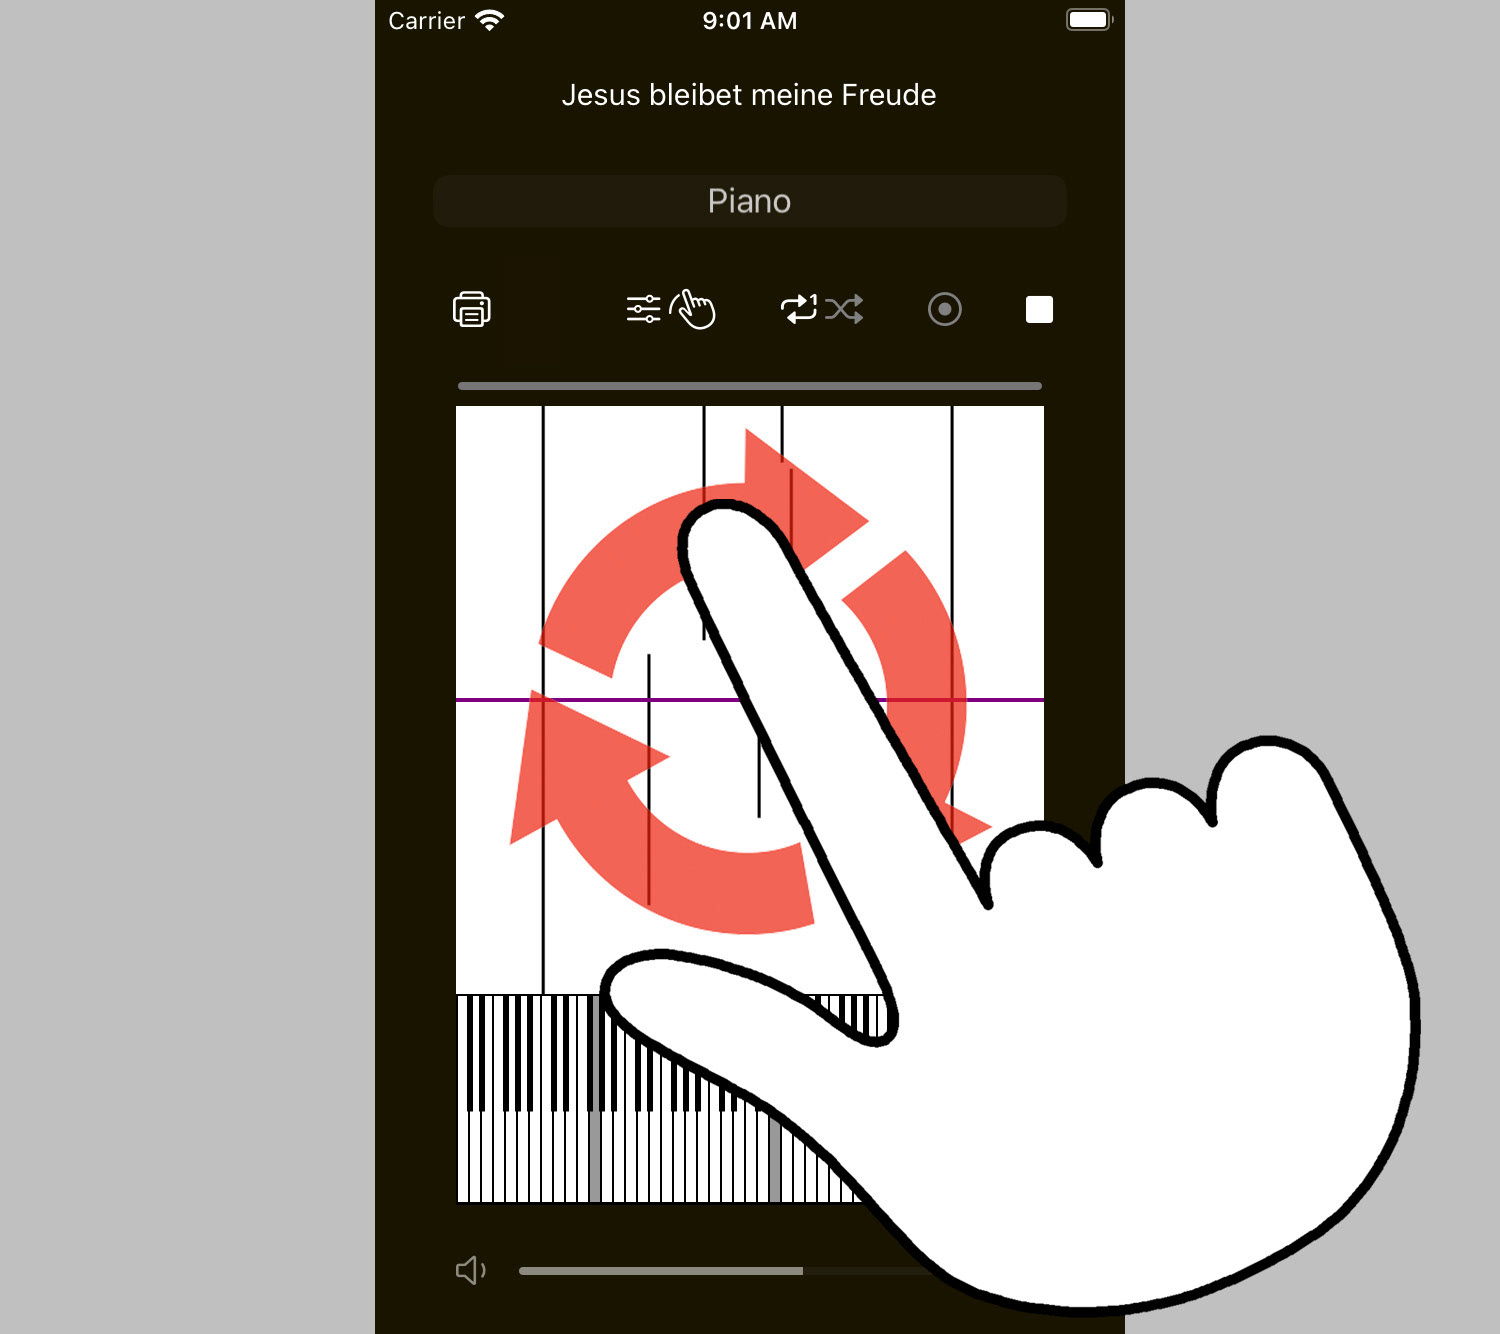
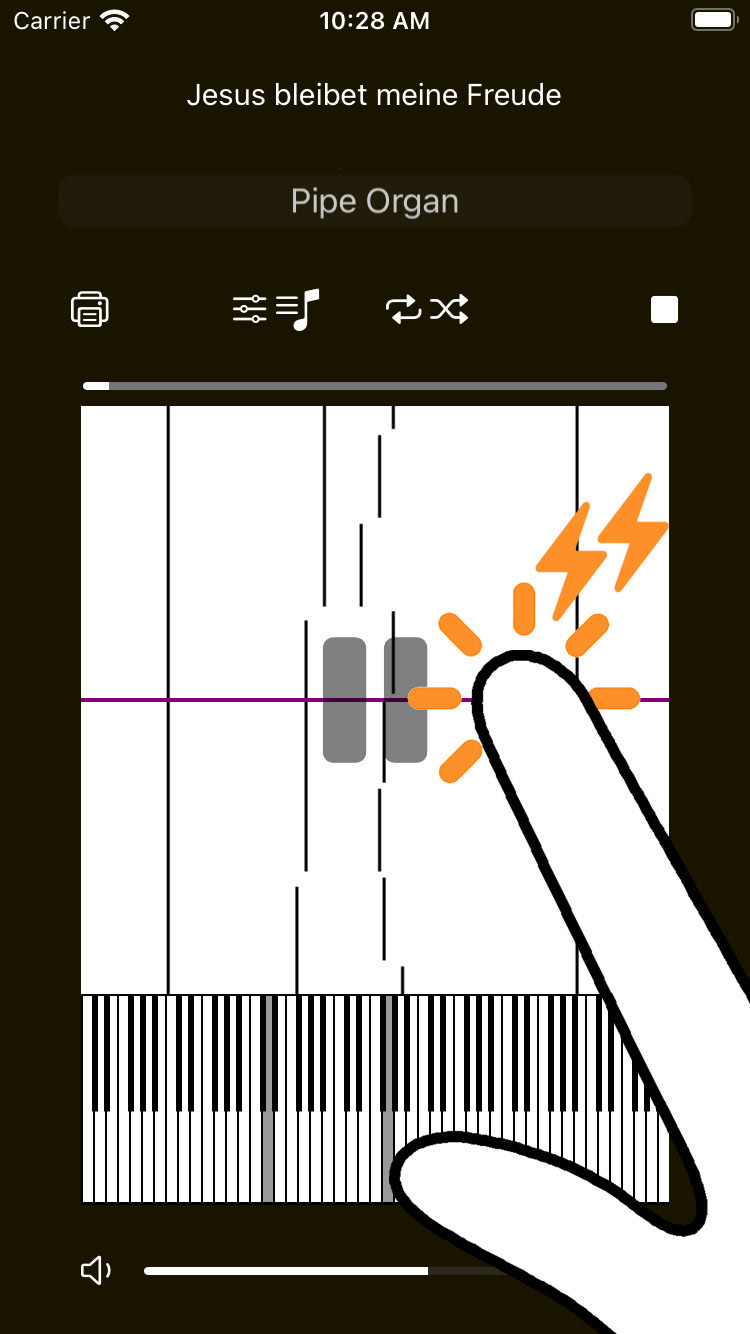
3.一本指のジェスチャーで回転。演奏が始まります。
3. Rotate with a single finger gesture. Start playing.
3. Rotate with a single finger gesture. Start playing.
(注)前面カメラによる指揮者モードを試したい方は「30.指揮者モードによる演奏」をお読みください。なお同モードを利用するには、「MIDIフィアイルの読み込み機能」および「カメラを使う機能」の購入が必要です。購入方法は15.および26.をお読みください。
(Note) If you wish to try the conductor mode using the front camera, please read "30. Performance in Conductor Mode". In order to use this mode, you need to purchase the "MIDI file import" and "Using the Camera" features. Please refer to 15. and 26. for the purchase method.
(Note) If you wish to try the conductor mode using the front camera, please read "30. Performance in Conductor Mode". In order to use this mode, you need to purchase the "MIDI file import" and "Using the Camera" features. Please refer to 15. and 26. for the purchase method.
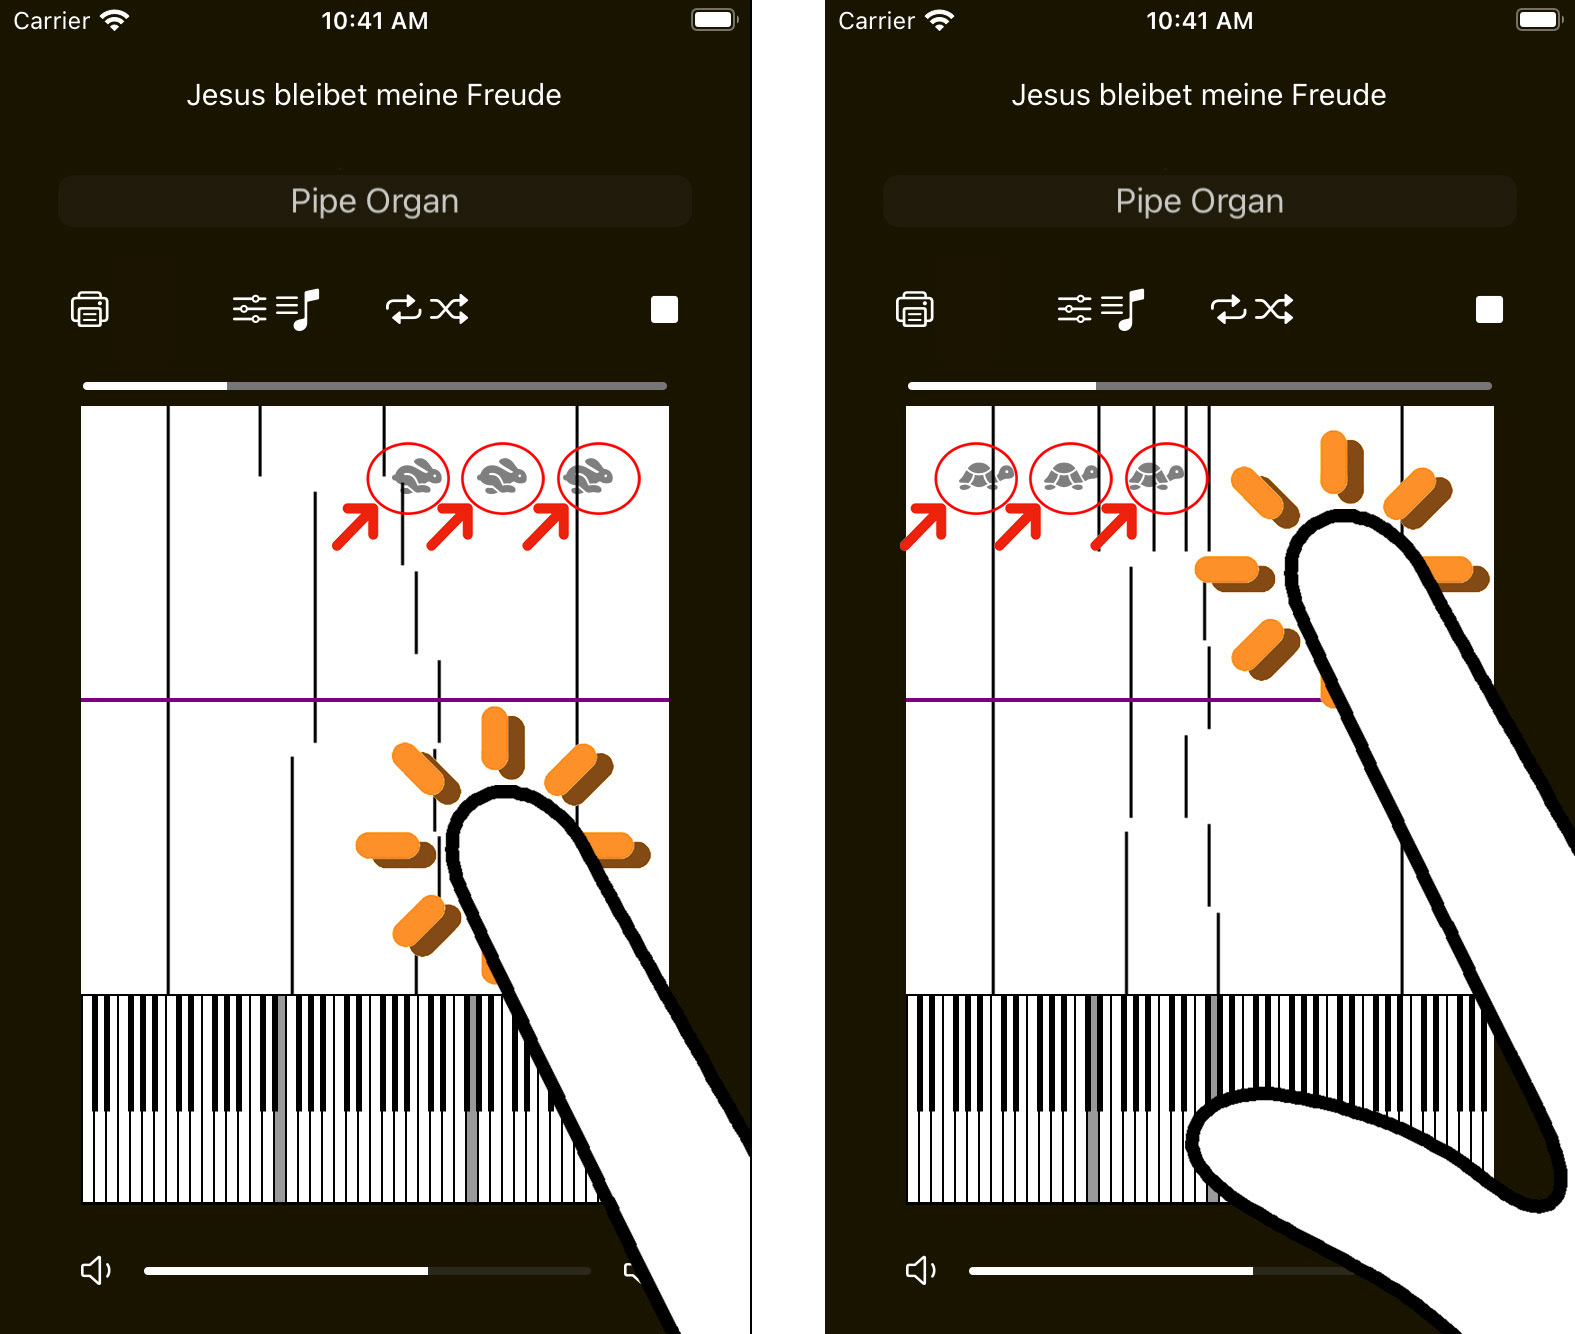
4.ゆっくり回せばゆっくり、速く回せば速く演奏されます。
4. If you turn it slowly, it will play slowly; if you turn it quickly, it will play quickly.
4. If you turn it slowly, it will play slowly; if you turn it quickly, it will play quickly.
5.大きく回せば大きな音で、小さく回せば小さな音で演奏されます。
5. A large turn will produce a loud sound, while a small turn will produce a quiet sound.
5. A large turn will produce a loud sound, while a small turn will produce a quiet sound.
6.反対方向に回せば逆転演奏ができます。
6. Turn it in the opposite direction to play in reverse.
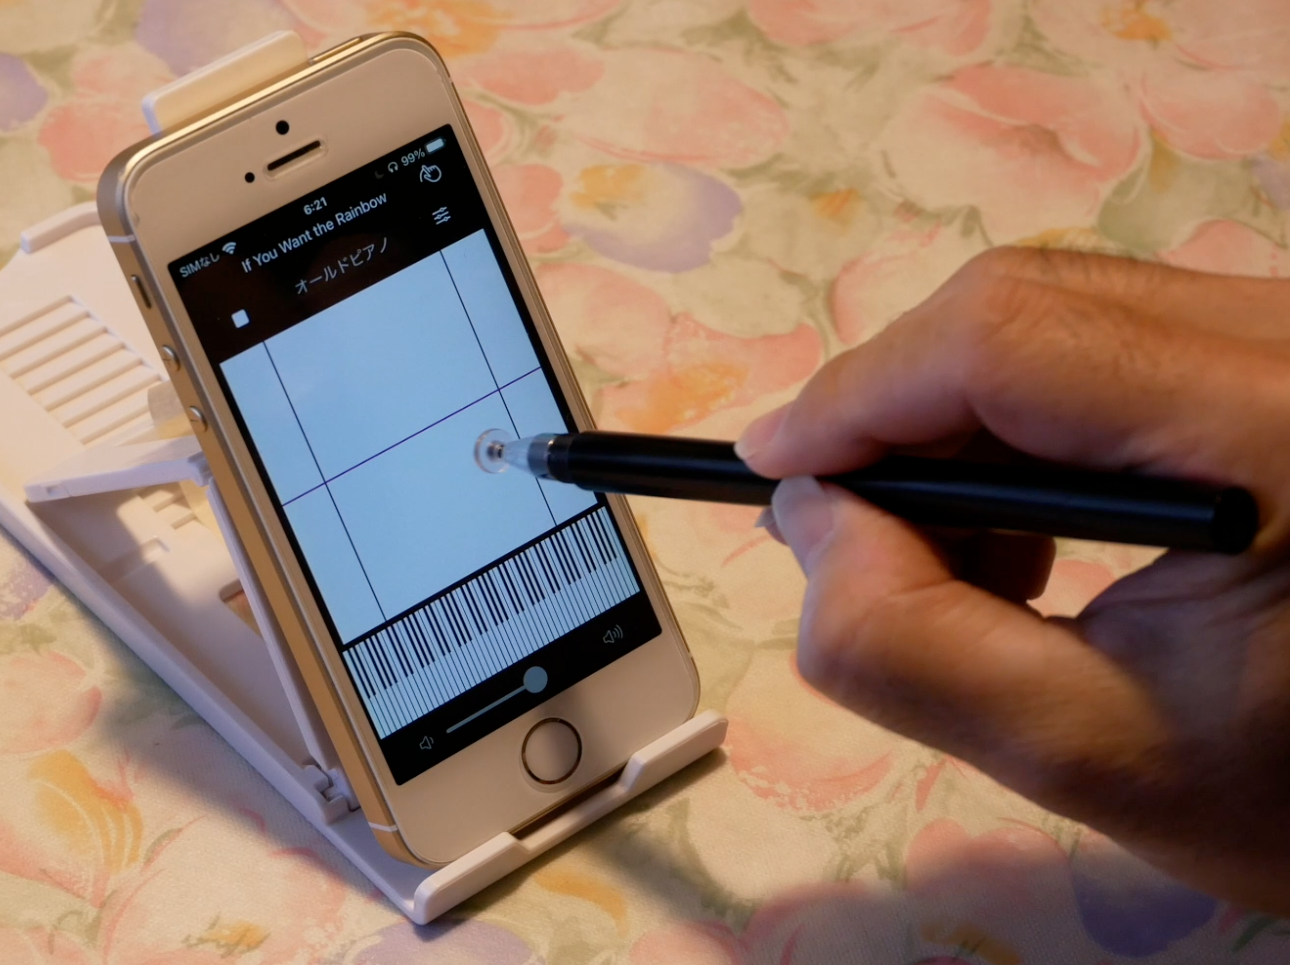
ヒント
なめらかに回転できないときは先端が透明のディスクになっているタッチペンを使うのがおすすめです。アルミホイルを指に巻くのも良いです。
Tips
If you cannot rotate smoothly, I recommend using a stylus with a transparent disc at the tip. Wrapping aluminum foil around your finger is also a good idea.
なめらかに回転できないときは先端が透明のディスクになっているタッチペンを使うのがおすすめです。アルミホイルを指に巻くのも良いです。
Tips
If you cannot rotate smoothly, I recommend using a stylus with a transparent disc at the tip. Wrapping aluminum foil around your finger is also a good idea.
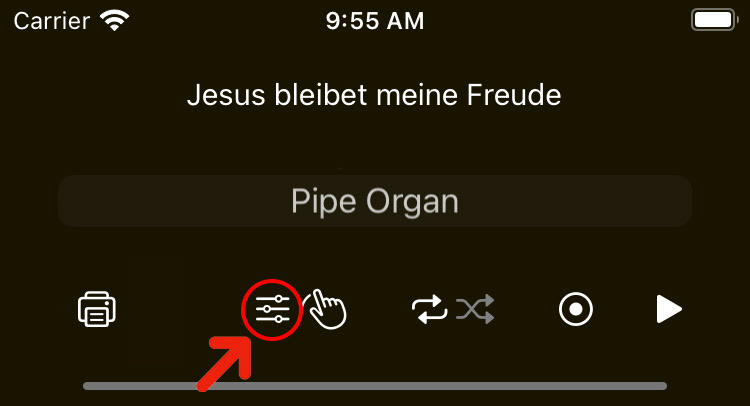
7.音色を変えたいときは一旦演奏を止めて、楽器名が表示されているアイテム(ピッカー)を上下にスクロールして変更します。57種類の楽器が選べます。
7. If you want to change the tone, stop playing and scroll up and down on the item (picker) that shows the name of the instrument to change it.There are 57 different instruments to choose from.
7. If you want to change the tone, stop playing and scroll up and down on the item (picker) that shows the name of the instrument to change it.There are 57 different instruments to choose from.
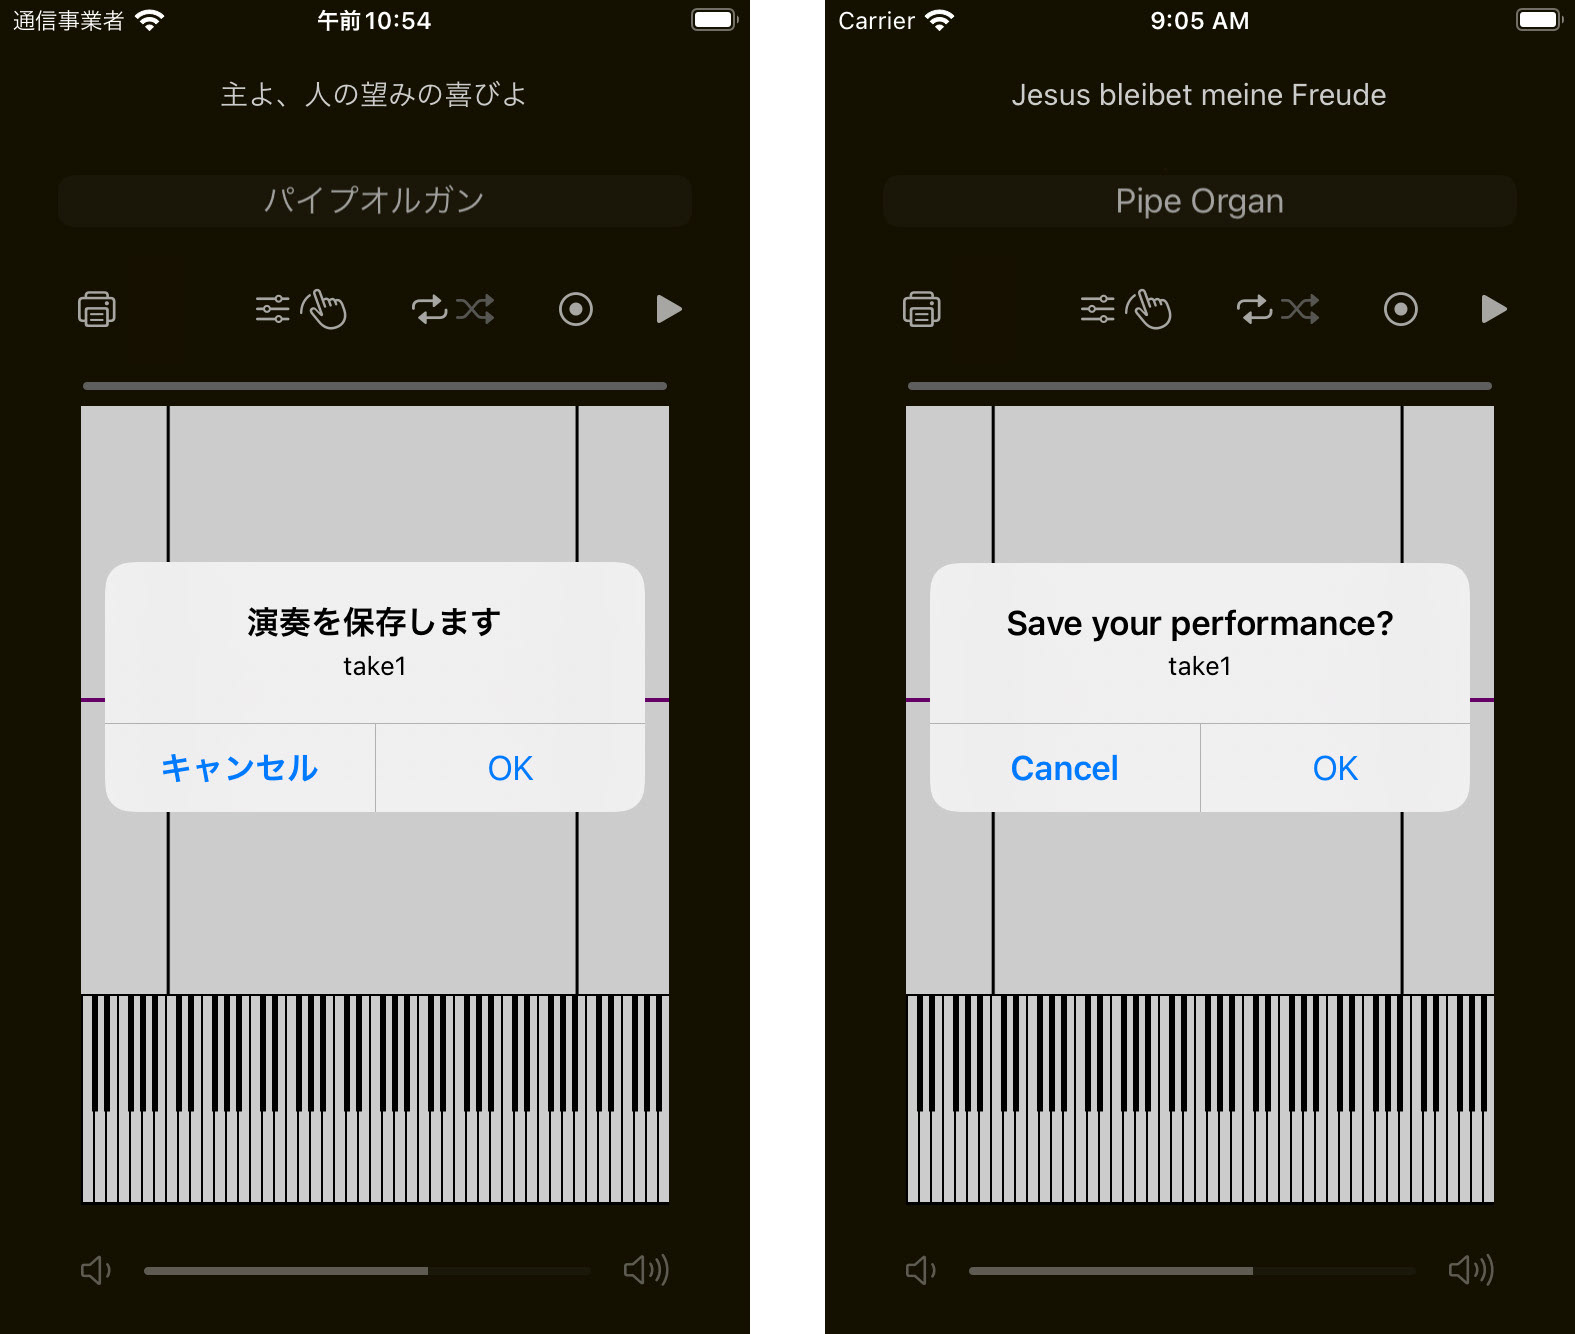
8.演奏を記録したいときは記録ボタンをタップします。停止するには停止ボタンをタップしてください。
8.Tap the Record button to record your performance. To stop, tap the Stop button.
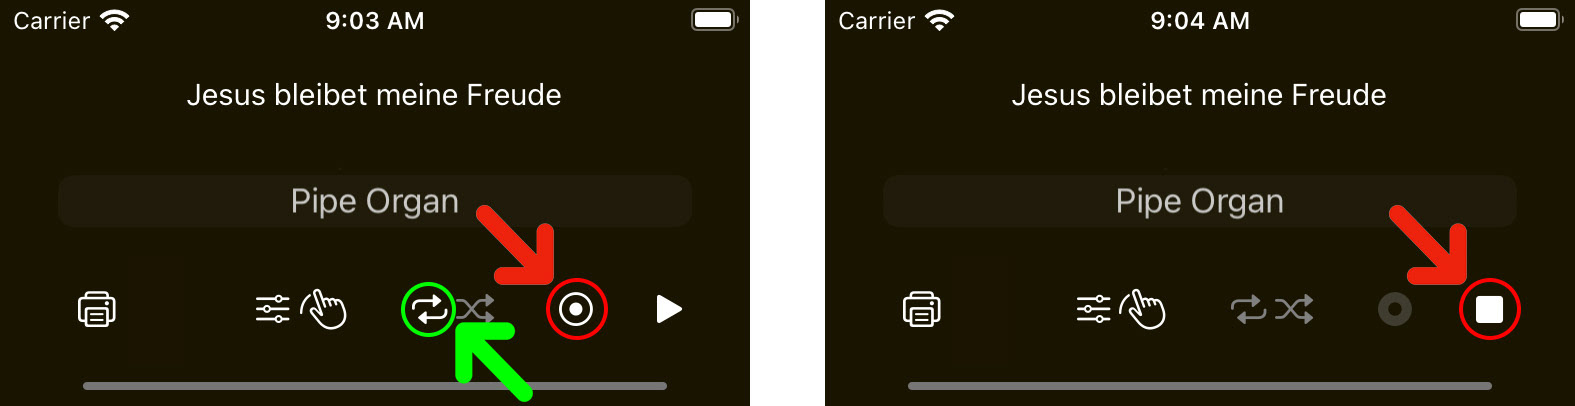
記録した演奏を保存する場合には「OK」をタップしてください。なお1曲リピートモードが設定されていなければ、楽譜の最後まで演奏すると自動的に停止して同様の操作となります。
To save the recorded performance, tap "OK.If the repeat one mode is not set, playing to the end of the score will automatically stop and the same operation will be performed.
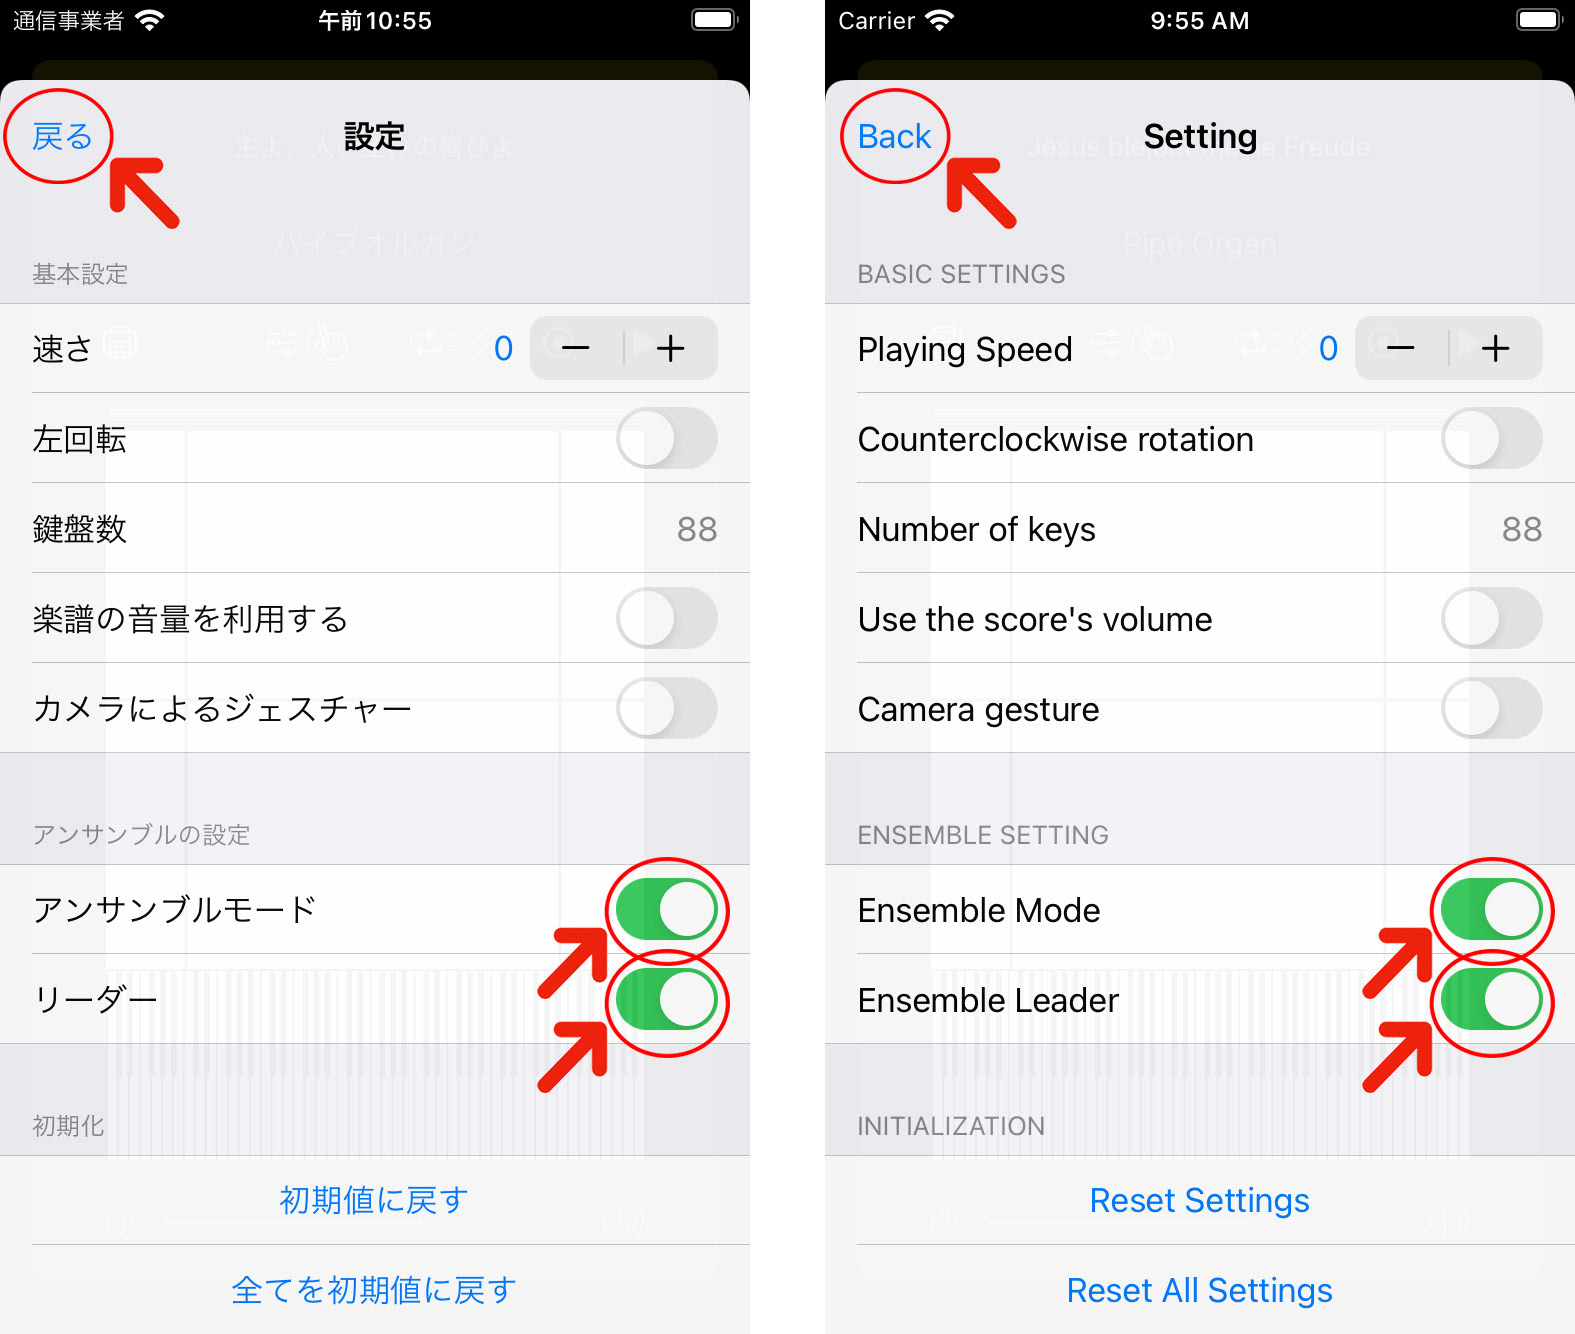
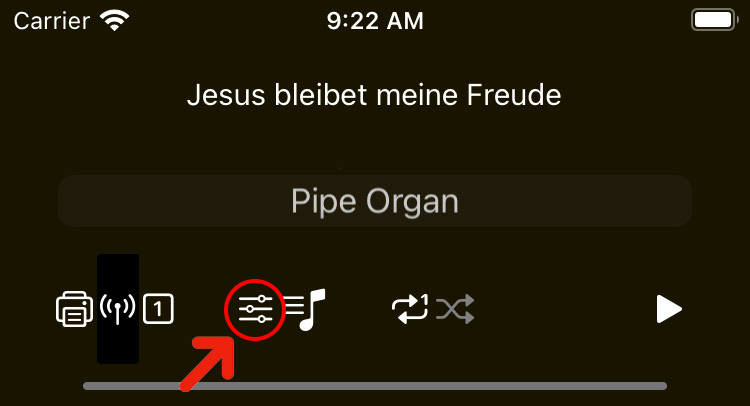
9.一人での演奏に飽きたら、複数のiPhoneを持ち寄ってアンサンブルができます。予めアンサンブルを行う全てのiPhoneの設定からWi-FiとBluetoothをオンにして、アンサンブルのリーダーとなるiPhoneの設定ボタンをタップします。
9. If you get tired of playing by yourself, you can bring multiple iPhones together for an ensemble. Turn on Wi-Fi and Bluetooth in the settings of all the iPhones in the ensemble beforehand, and tap the settings button on the iPhone that will be the leader of the ensemble.
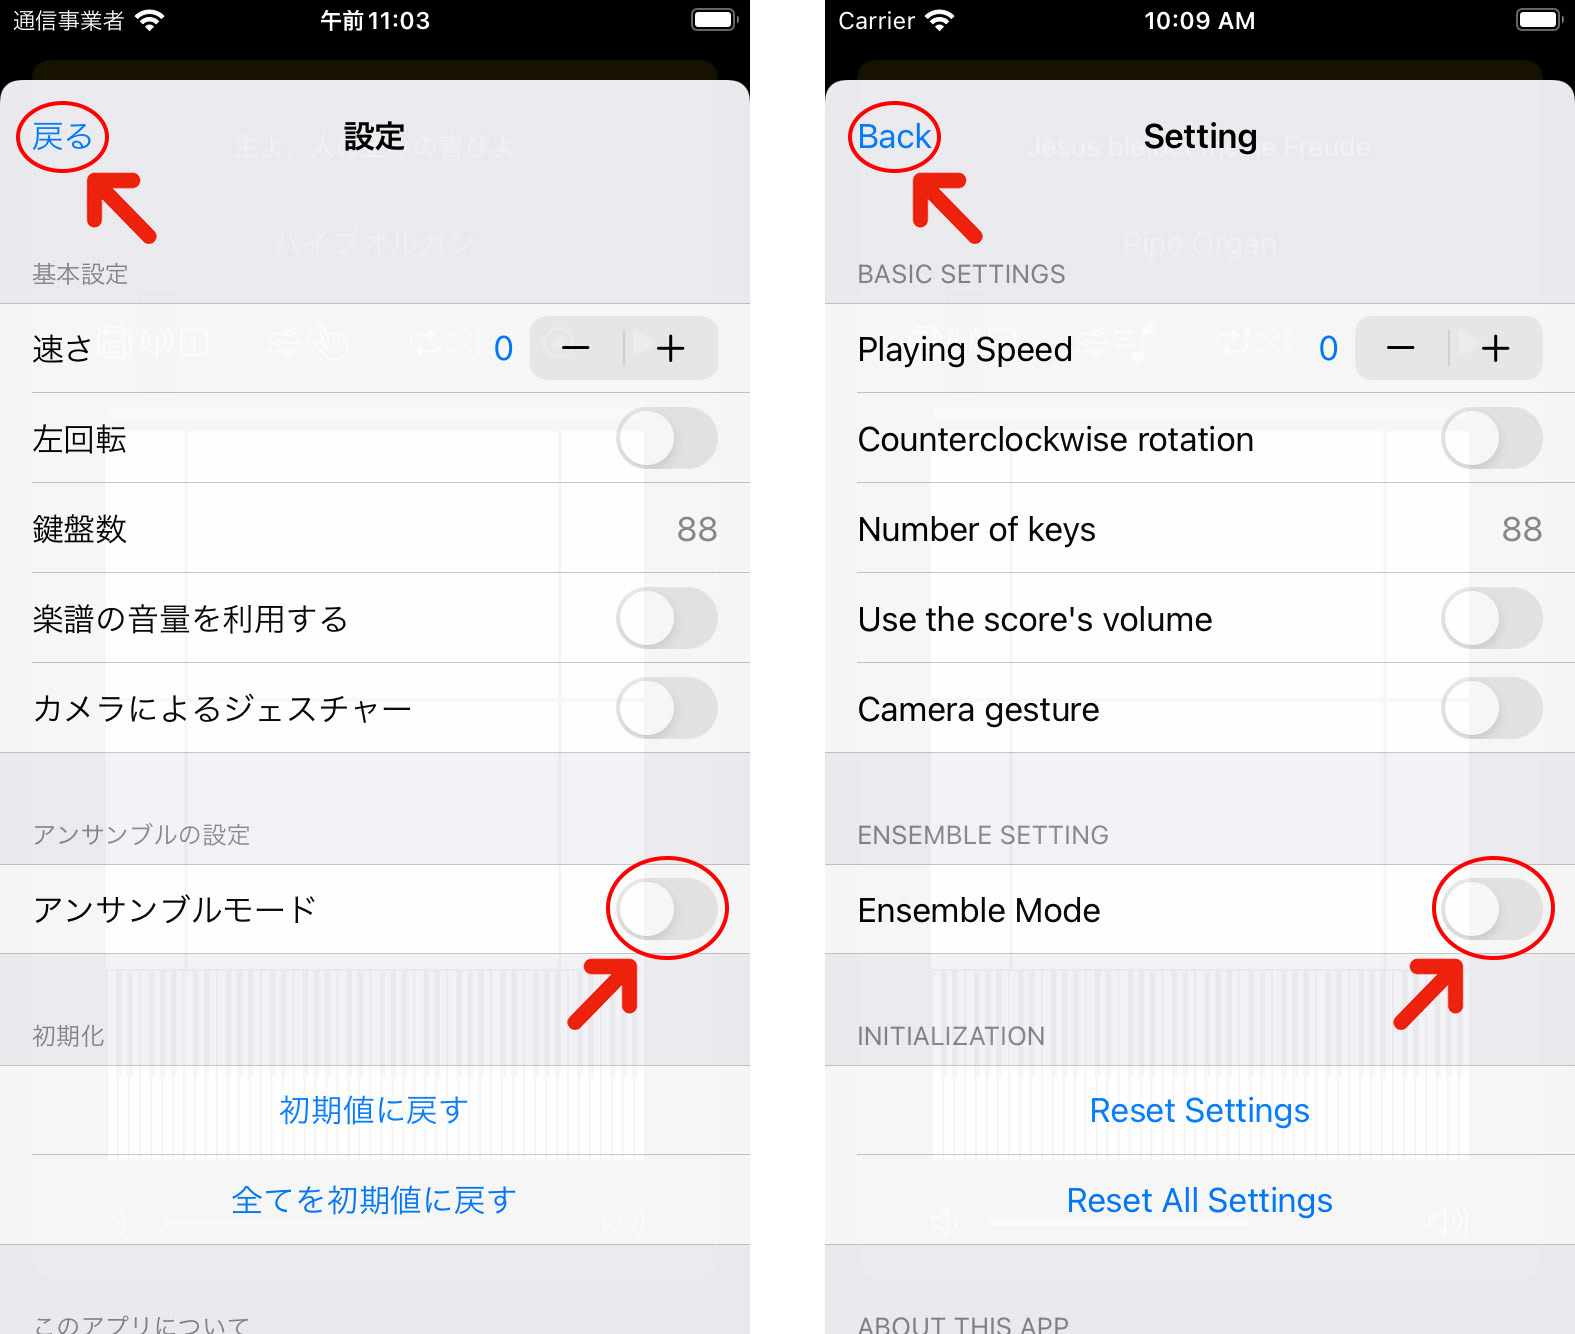
設定ビューから「アンサンブルモード」と「リーダー」スイッチをオンにして、「戻る」ボタンをタップします。
From the Settings view, turn on the "Ensemble Mode" and "Ensemble Leader" switches, then tap the "Back" button.
From the Settings view, turn on the "Ensemble Mode" and "Ensemble Leader" switches, then tap the "Back" button.
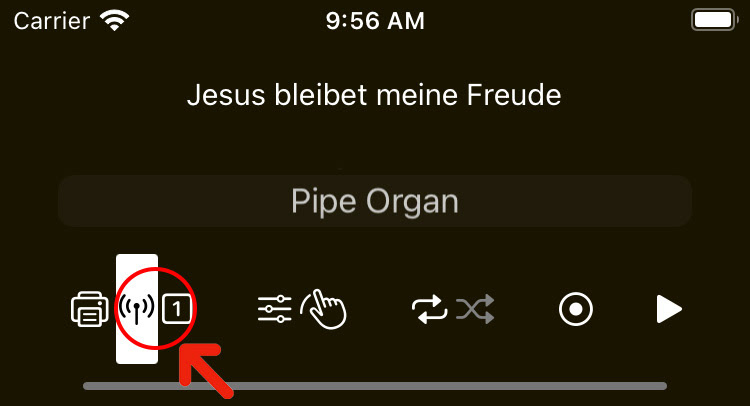
ホームビューに戻ると、アンサンブルモードのリーダーを示すアイコンとアンサンブルを行うiPhoneの台数が表示されます。
When you return to the Home View, you will see two icon indicating the leader of the ensemble mode and the number of iPhones in the ensemble.
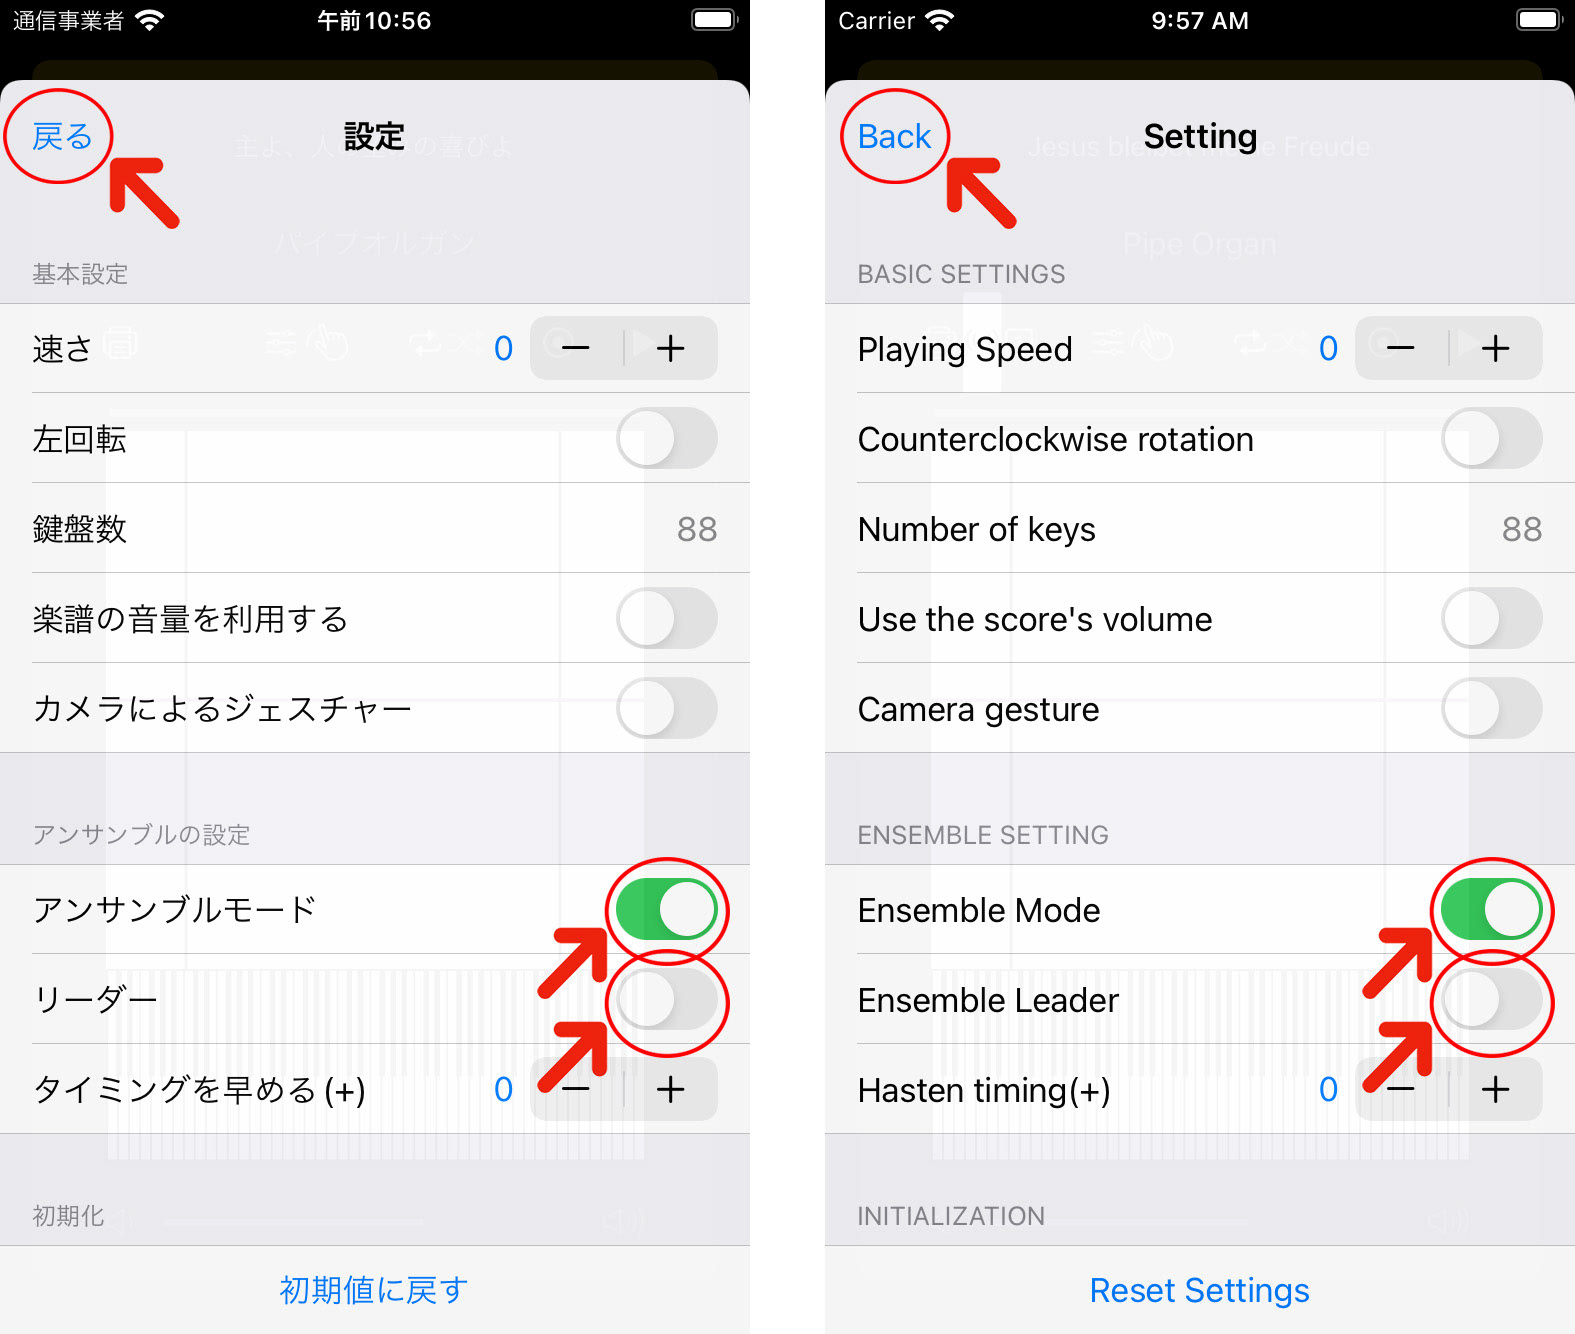
10.次はアンサンブルのメンバーとなるiPhoneの設定ボタンを8.と同様にタップします。設定ビューから「アンサンブルモード」スイッチをオン、「リーダー」スイッチをオフにして、「戻る」ボタンをタップします。「タイミングを早める(+)」の設定はここでは0のままとしておきます。
10. Next, tap the Settings button on the iPhone that will be a member of the ensemble, as in step 8. From the Settings view, turn on the "Ensemble Mode" switch, turn off the "Ensemble Leader" switch, and tap the "Back" button. Leave the "Hasten timing (+)" setting at 0 for now.
10. Next, tap the Settings button on the iPhone that will be a member of the ensemble, as in step 8. From the Settings view, turn on the "Ensemble Mode" switch, turn off the "Ensemble Leader" switch, and tap the "Back" button. Leave the "Hasten timing (+)" setting at 0 for now.
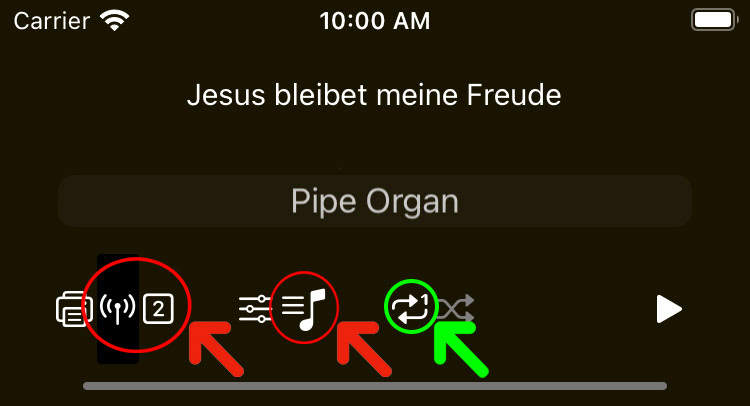
ホームビューに戻ると、アンサンブルモードのメンバーを示すアイコンとアンサンブルを行うiPhoneの台数が表示されるので、右側にあるモードボタンをタップして自動演奏モードに切り替えます。
なおこの時リーダー、メンバーともに1曲リピートモードに設定してください。他の設定の動作は保証されません。
When you return to the Home View, you will see an icon indicating the members of the ensemble mode and the number of iPhones in the ensemble, so tap the Mode button on the right to switch to Auto Play mode.
At this time, both the leader and members should be set to repeat one mode. Other settings are not guaranteed.
11.これで準備は整いました。アンサンブルのリーダーは今まで通り、ジェスチャーで演奏を始めます。するとアンサンブルのメンバーのiPhoneは自動演奏モードになっているので、リーダーの演奏に伴って自動的に演奏が始まります。
11. We are now ready to begin. The leader of the ensemble starts playing with a gesture as before. Then, since the ensemble members' iPhones are in Auto Play mode, they will automatically start playing along with the leader's performance.
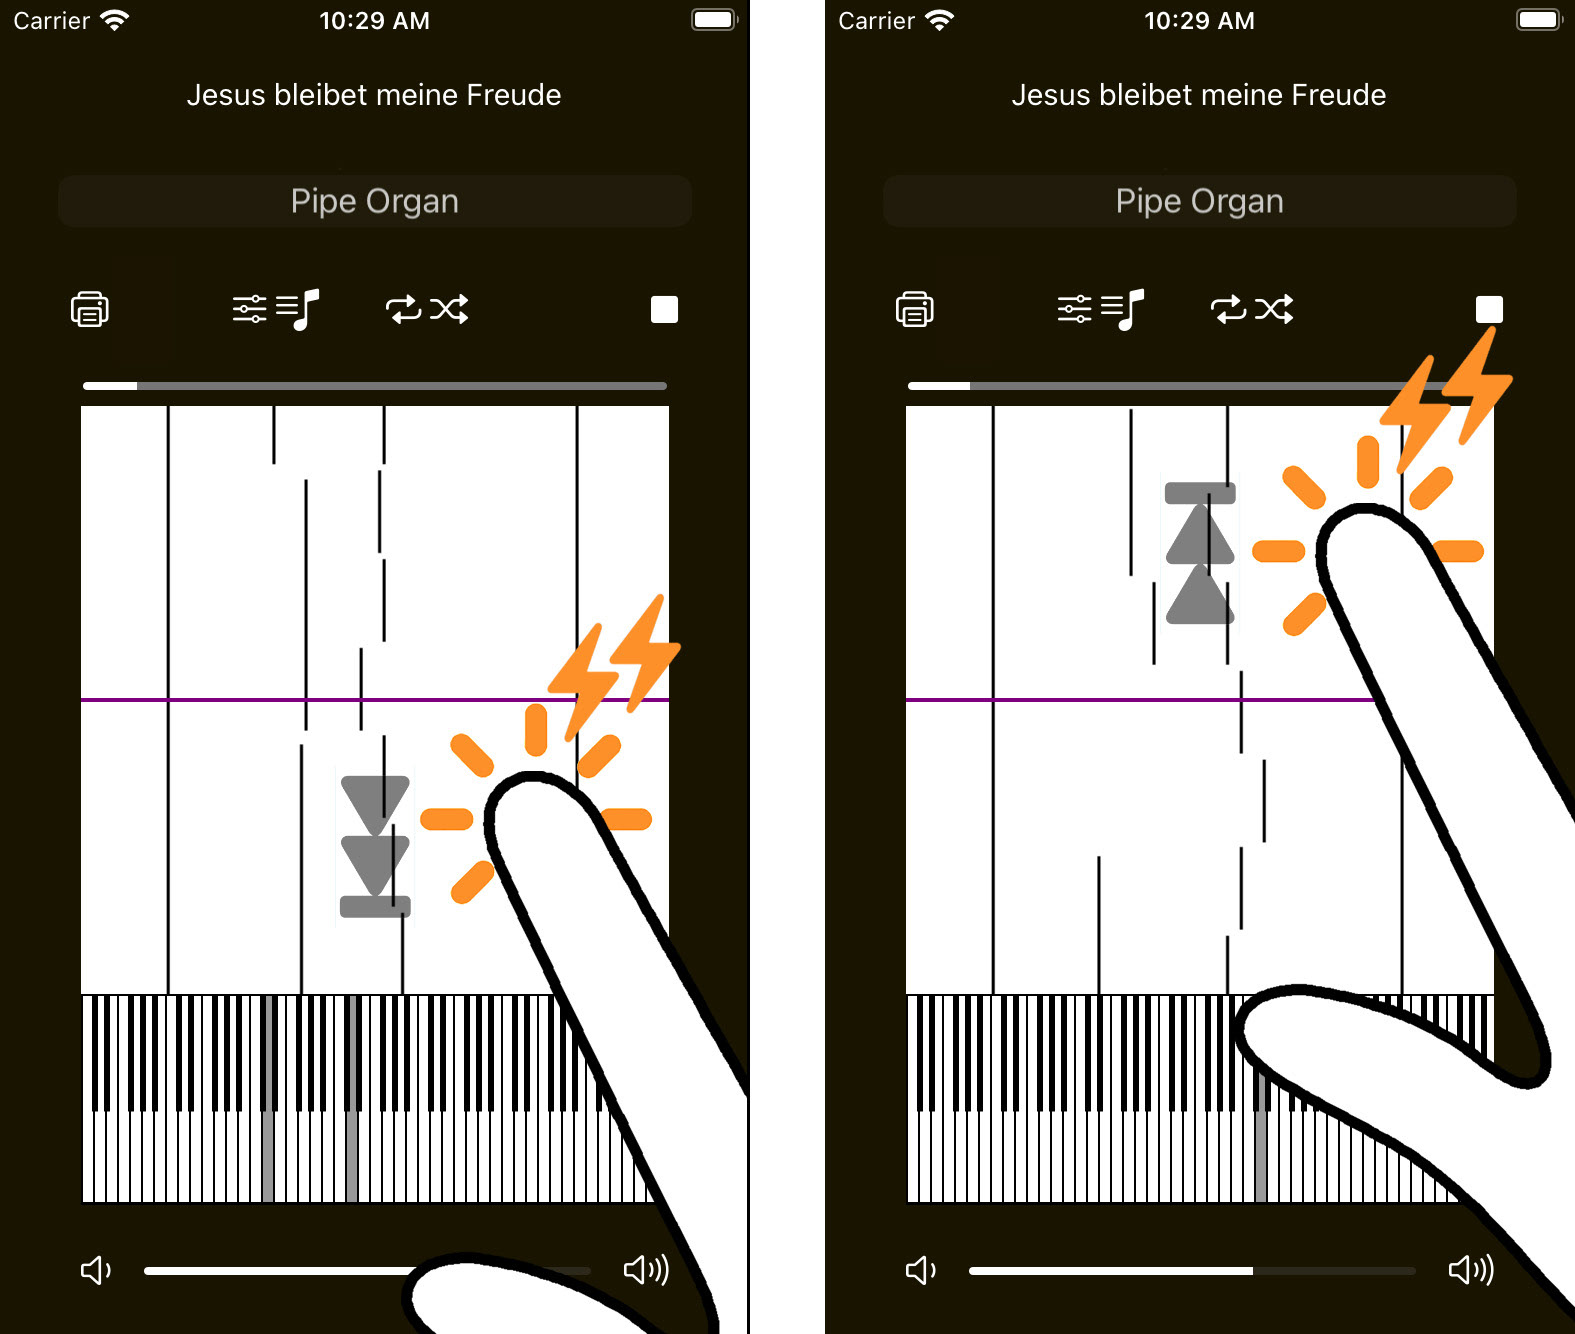
12.自動的に演奏が始まったら、メンバーは適当なタイミングでジェスチャーによる演奏を始めます。メンバーの演奏が始まると画面がグレーに変わり、自動演奏される黒い音符の上に、メンバーが演奏する白い音符が重ねて表示されます。この時、メンバーの演奏が遅れている時は、白い音符が黒い音符の上側に来ます。
12. When the performance starts automatically, the members can start playing by gesturing at the appropriate timing. When the member's own performance begins, the screen will turn gray, and the white notes played by the member will be superimposed on the black notes played automatically. At this time, if the member's own performance is delayed, the white note will be above the black note.
12. When the performance starts automatically, the members can start playing by gesturing at the appropriate timing. When the member's own performance begins, the screen will turn gray, and the white notes played by the member will be superimposed on the black notes played automatically. At this time, if the member's own performance is delayed, the white note will be above the black note.
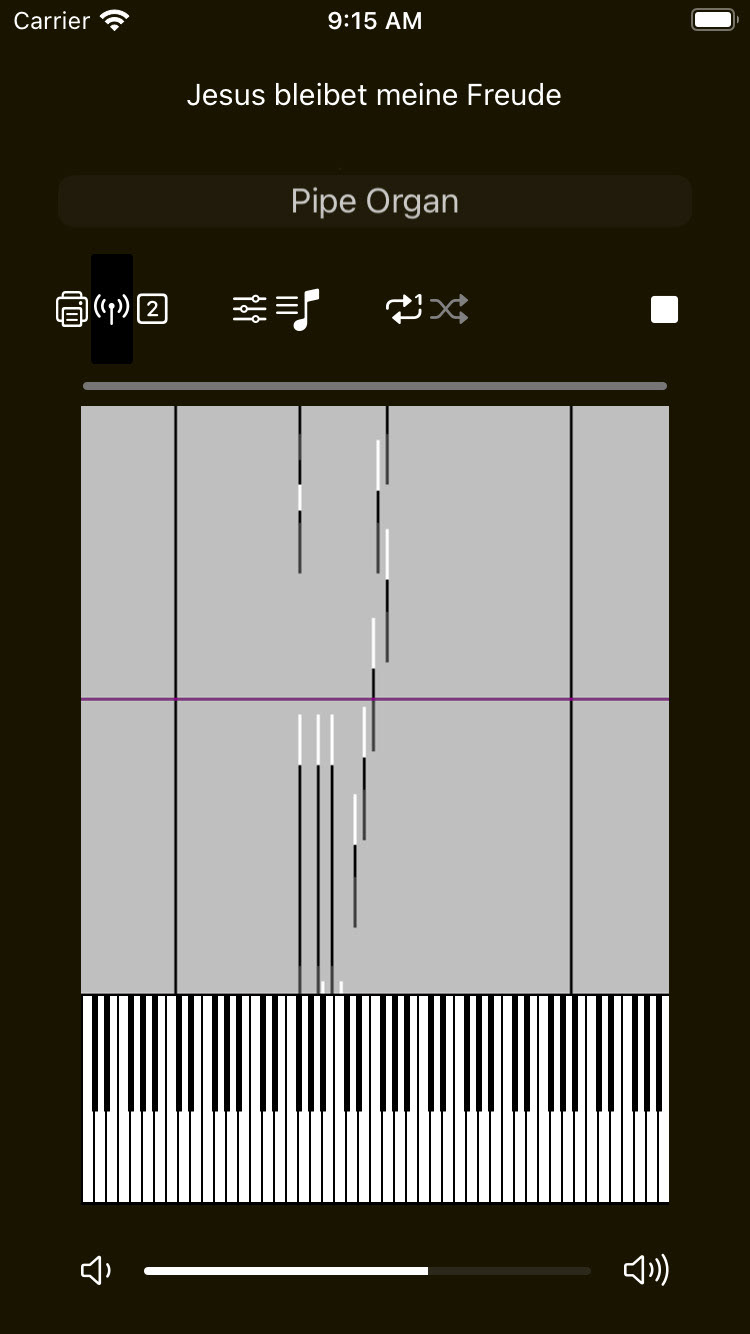
13.逆にメンバーの演奏が進んでいる時は、白い音符が黒い音符の下側に来ます。
13. On the other hand, when your own playing is progressing, the white notes will be below the black notes.
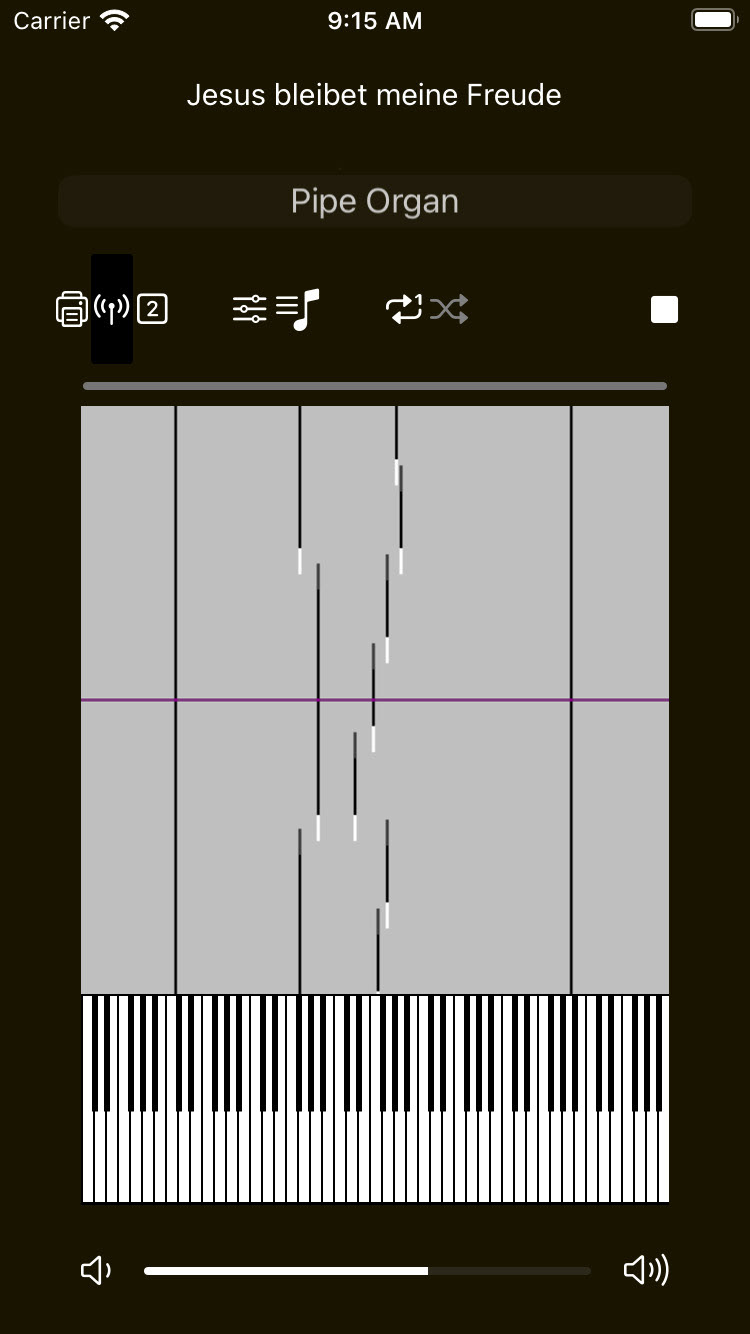
14.これでメンバーは自分の演奏がリーダーの演奏に比べて遅れているのか進んでいるのかが視覚的に確認できるので、自身の演奏の速さをコントロールして白い音符が黒い音符になるべく重なるようにすれば、リーダーの演奏にタイミングとテンポを合わせた合奏が可能となります。
14. Now the members can visually see whether their own performance is lagging behind or ahead of the leader's, therefore if the members controls the speed of their own performance so that the white notes overlap the black notes as much as possible, they will be able to match the timing and tempo of the leader's performance to the ensemble.
14. Now the members can visually see whether their own performance is lagging behind or ahead of the leader's, therefore if the members controls the speed of their own performance so that the white notes overlap the black notes as much as possible, they will be able to match the timing and tempo of the leader's performance to the ensemble.
ヒント
1台のiPhoneでアンサンブルの練習もできます。後述する自動演奏モードでの演奏中にジェスチャーを行うと、アンサンブルのメンバーの演奏と同様に楽譜が重ねて表示されます。なおこの時、録音したテイクに対しての動作は保証されないので、必ず楽譜の情報ビュー(18.で説明)からoriginalテイクを選択してください。
Tips
You can also practice with an ensemble using a single iPhone. If you make a gesture during a performance in the Auto Play mode (described below), the score you are playing will be superimposed, just as it would be for an ensemble member's performance.
Note that this is not guaranteed to work for recorded takes, so be sure to select the original take from the Score Information view(described in 18.).
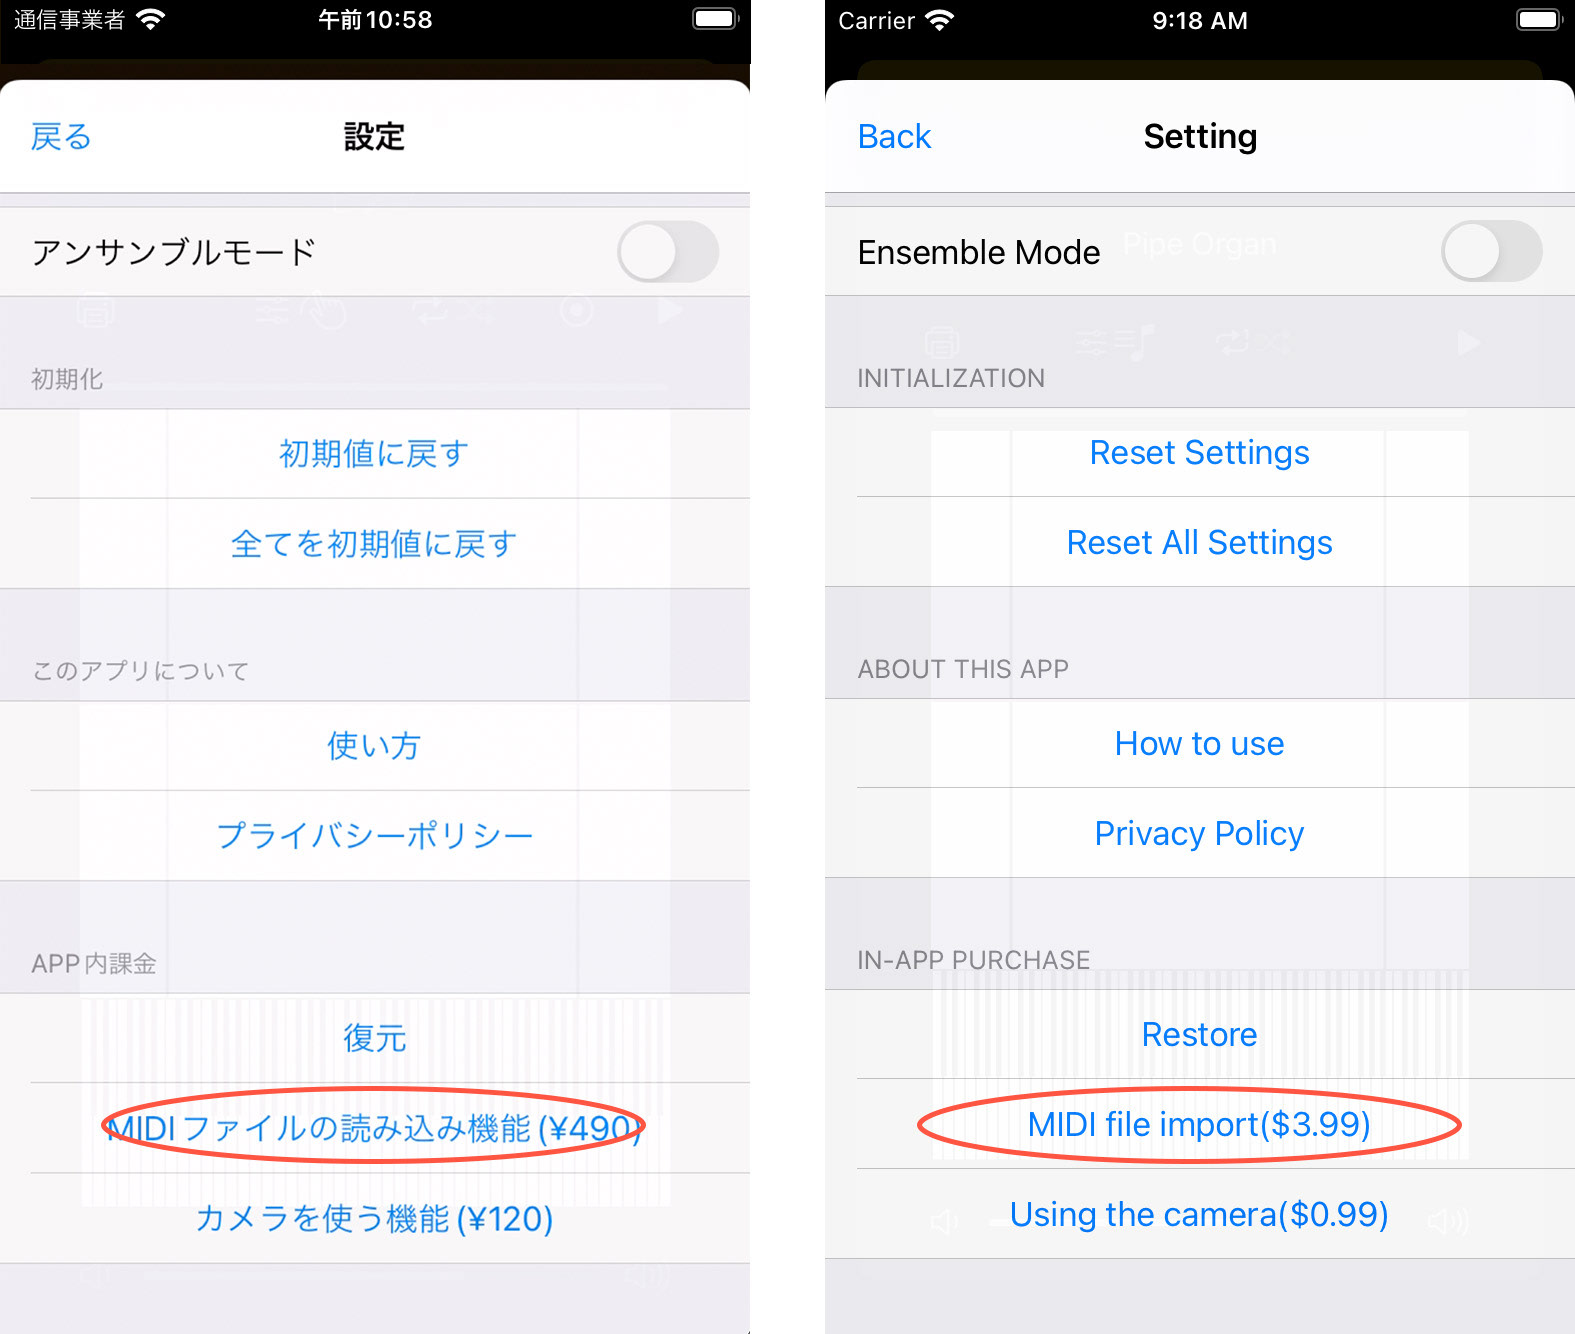
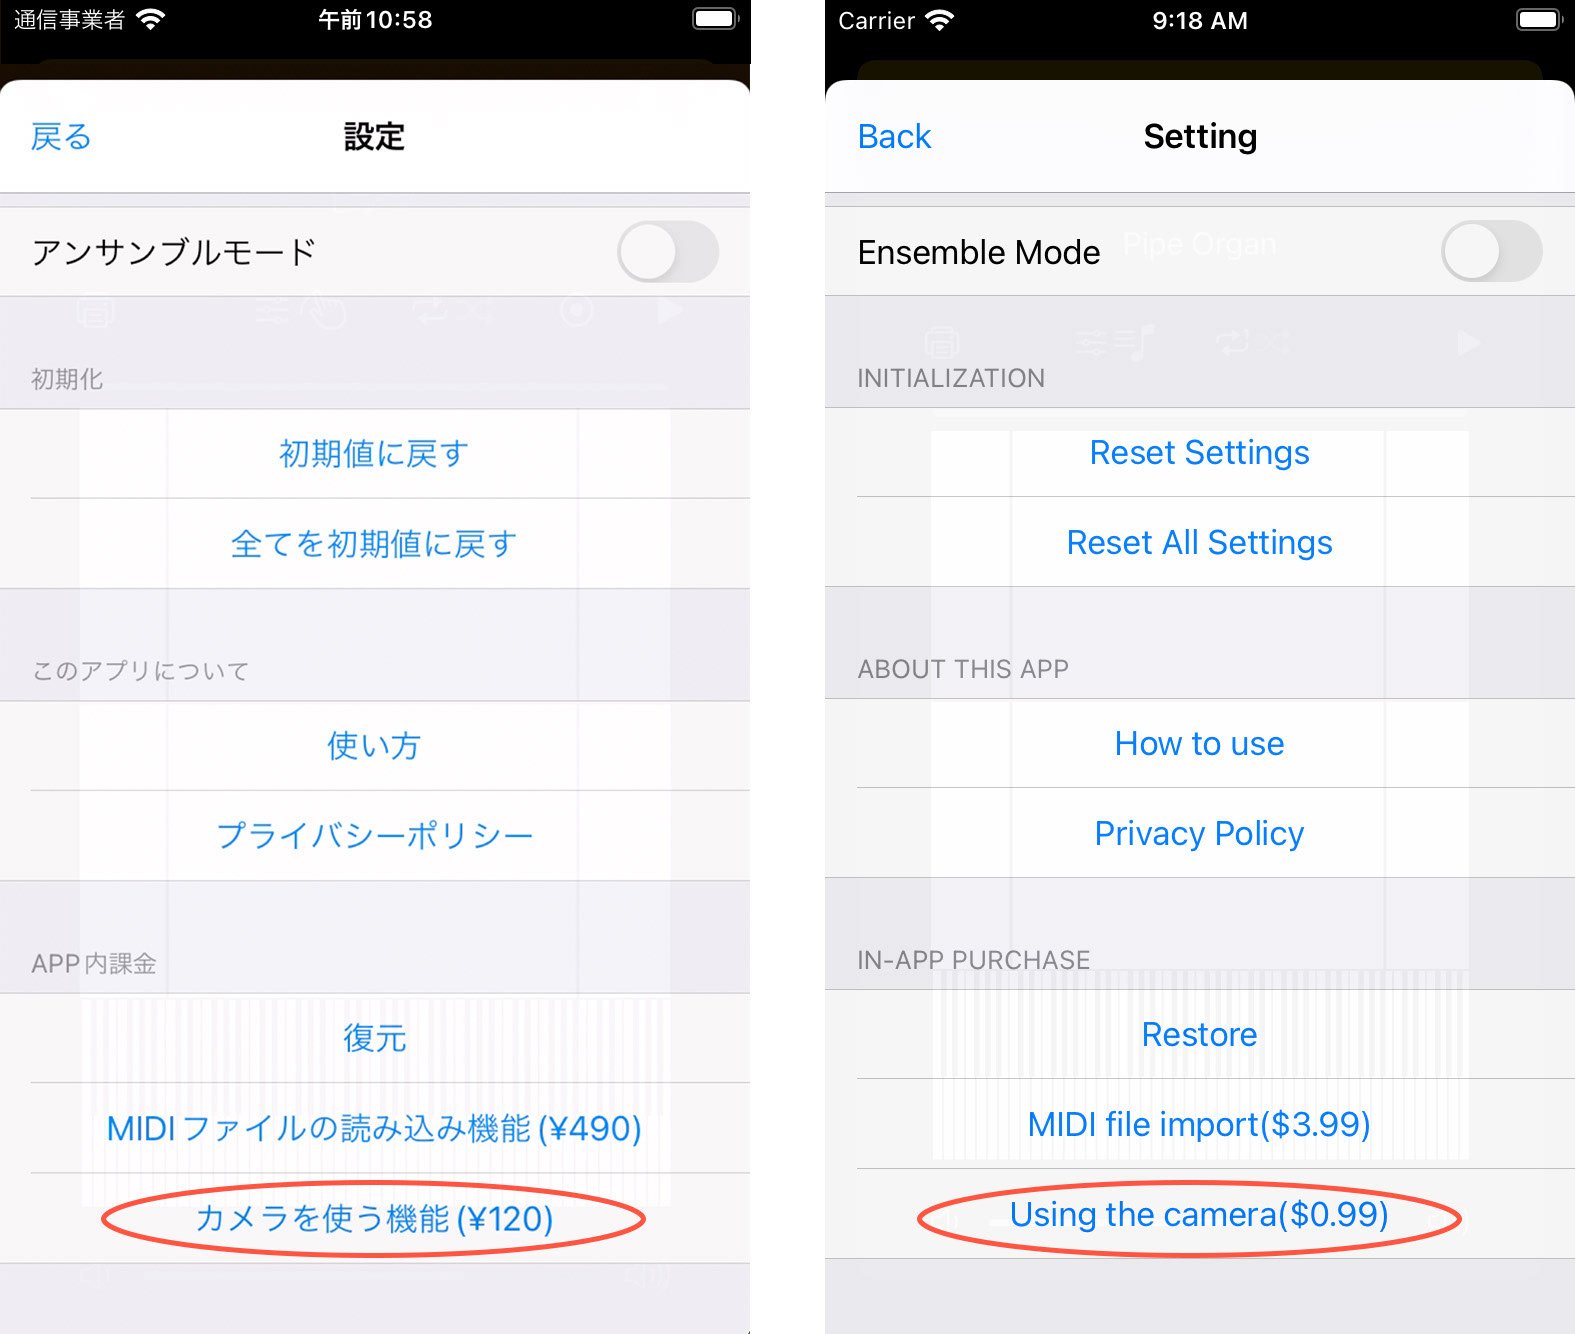
15.演奏に慣れてきて「別の曲も演奏したい」と思ったら「MIDIファイルの読み込み機能」をご購入ください。設定ボタンをタップしてAPP内課金メニューから購入します。「メール」、「AirDrop」、「ファイル」などからアプリ内に読み込むことができるようになります。
なおiOS 17からAirDropを使ってmidiファイルをRollPlayerPianoに取り込むには、一旦「ファイルアプリ」に取り込んでからRollPlayerPianoにコピーを送信する方法に変更になっているので、ご注意ください。
15. When you get used to playing and want to play other songs, please purchase the "MIDI file import". Tap the Settings button and purchase it from the In-App Purchase menu. You will be able to import MIDI files from "Mail", "AirDrop", "File", etc. into the app.
Please note that the method for importing midi files into RollPlayerPiano using AirDrop has changed from iOS 17 to importing the files into the "File app" and then sending a copy to RollPlayerPiano.

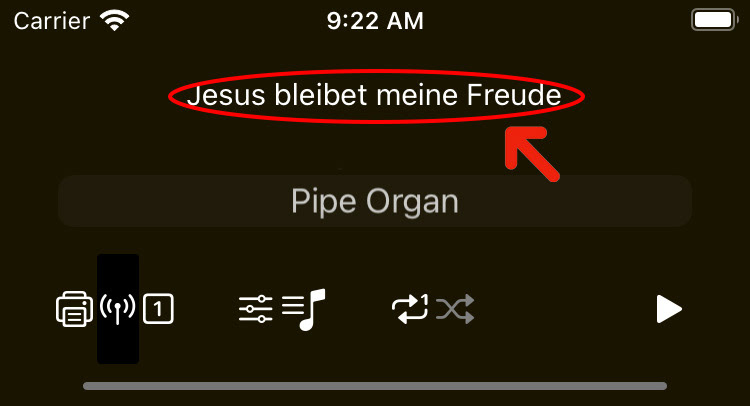
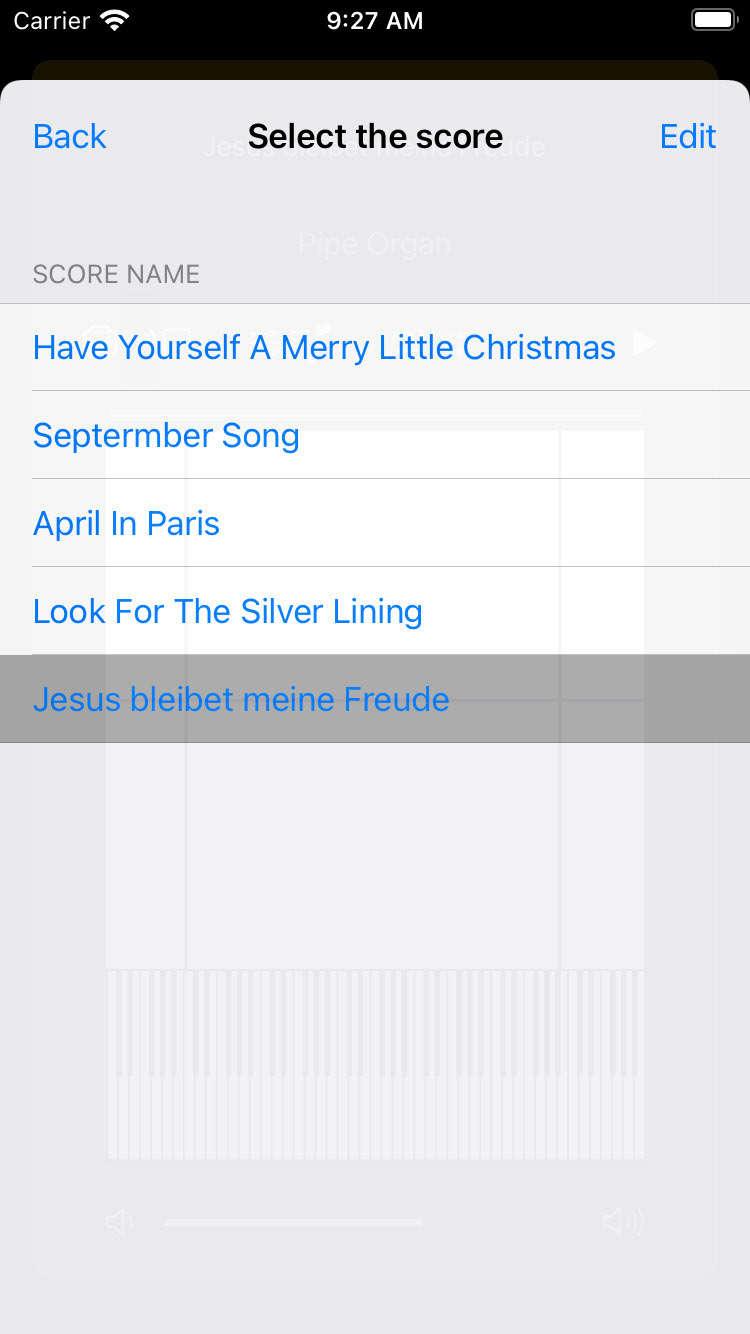
16.読み込んだMIDIファイルはファイル名をタップすると現れる楽譜選択ビューから選択できるようになります。
16. Once imported, you can select the MIDI file from the score selection view that appears when you tap the file name.
16. Once imported, you can select the MIDI file from the score selection view that appears when you tap the file name.
ヒント
MIDIファイルはmusescoreといったアプリケーションを使って自分で作ることができます。本アプリはmusescoreからエクスポートしたファイルを使って動作を確認しています。
Tips
You can create your own MIDI files using an application such as musescore. This application has been tested using a file exported from musescore.
MIDIファイルはmusescoreといったアプリケーションを使って自分で作ることができます。本アプリはmusescoreからエクスポートしたファイルを使って動作を確認しています。
Tips
You can create your own MIDI files using an application such as musescore. This application has been tested using a file exported from musescore.
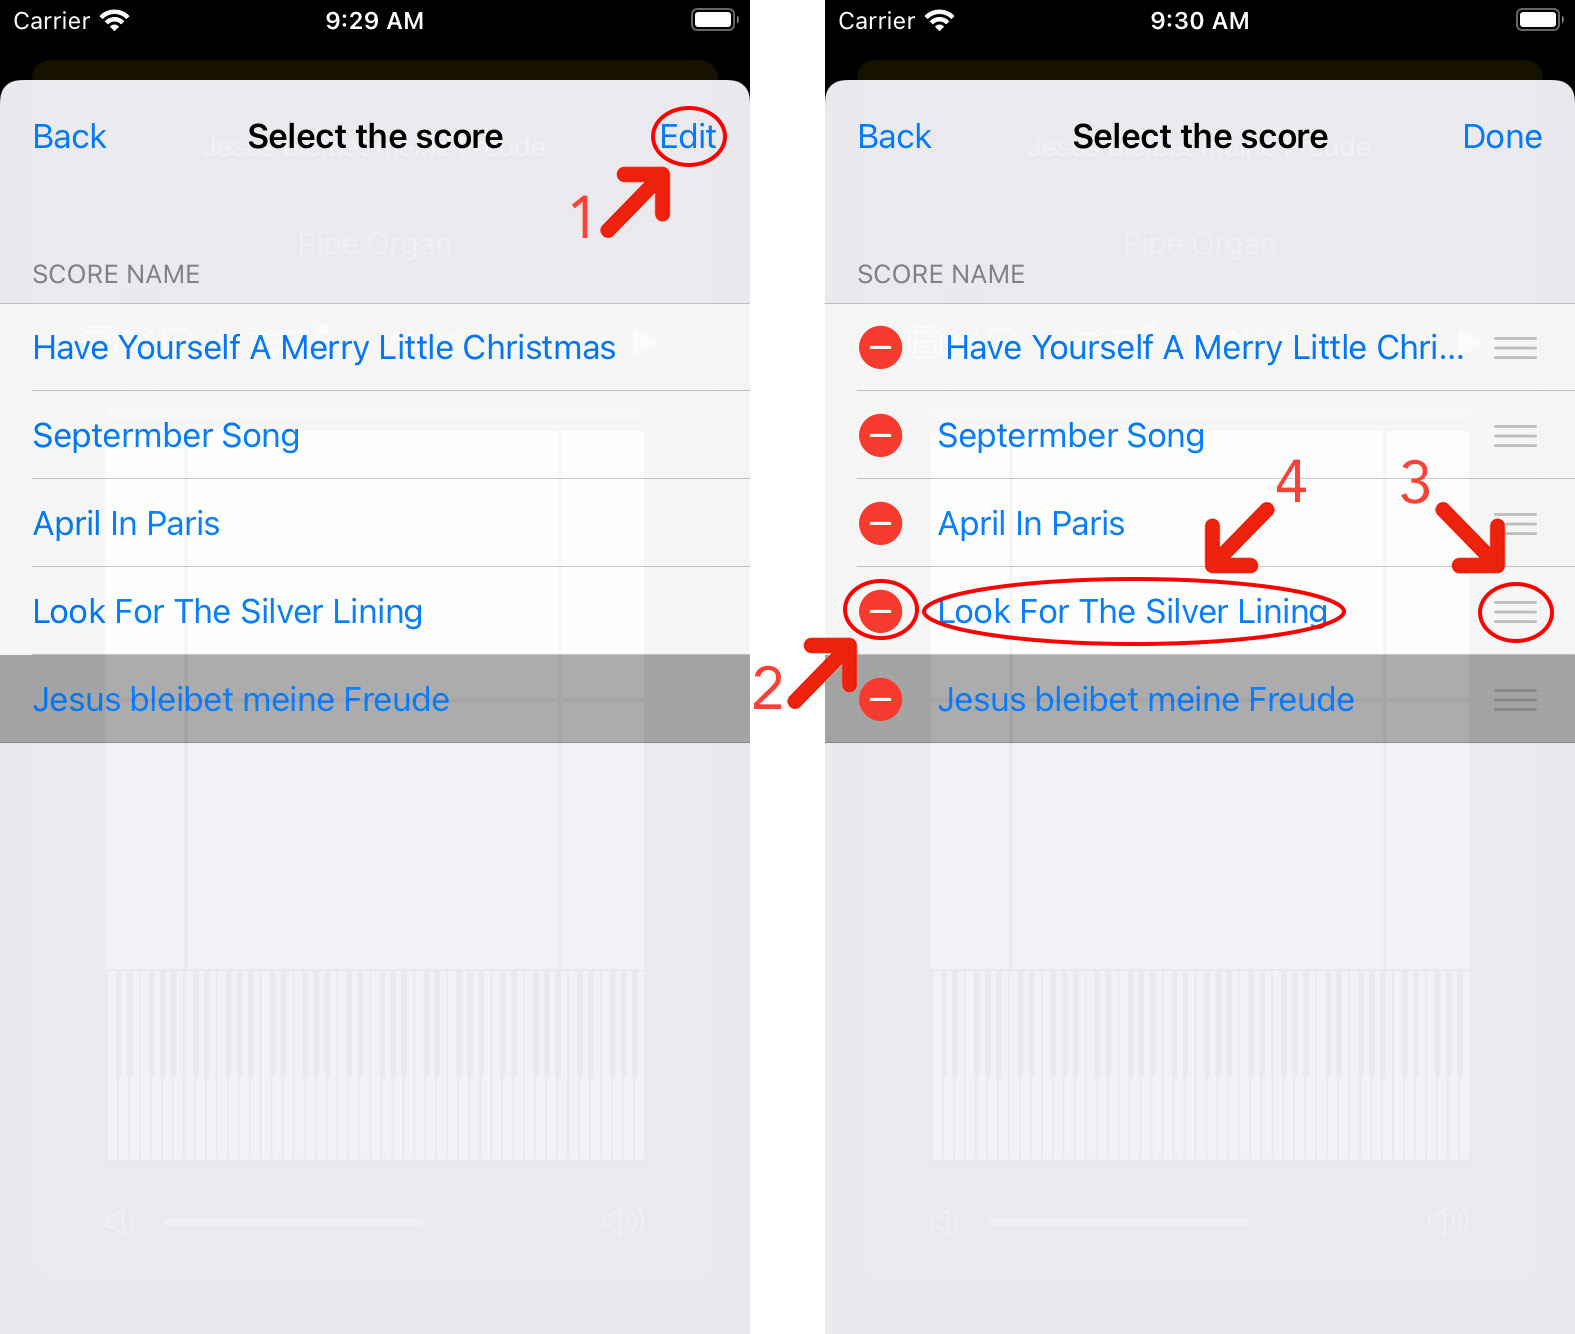
17.楽譜選択ビューの編集ボタン(矢印1)をタップすると編集モードに入り、楽譜の削除(矢印2)、並び替え(矢印3)、タイトルの編集(矢印4)ができます。
17. Tap the Edit button (arrow 1) in the score selection view to enter edit mode, where you can delete (arrow 2), reorder (arrow 3), or edit the title (arrow 4) of the score.
17. Tap the Edit button (arrow 1) in the score selection view to enter edit mode, where you can delete (arrow 2), reorder (arrow 3), or edit the title (arrow 4) of the score.
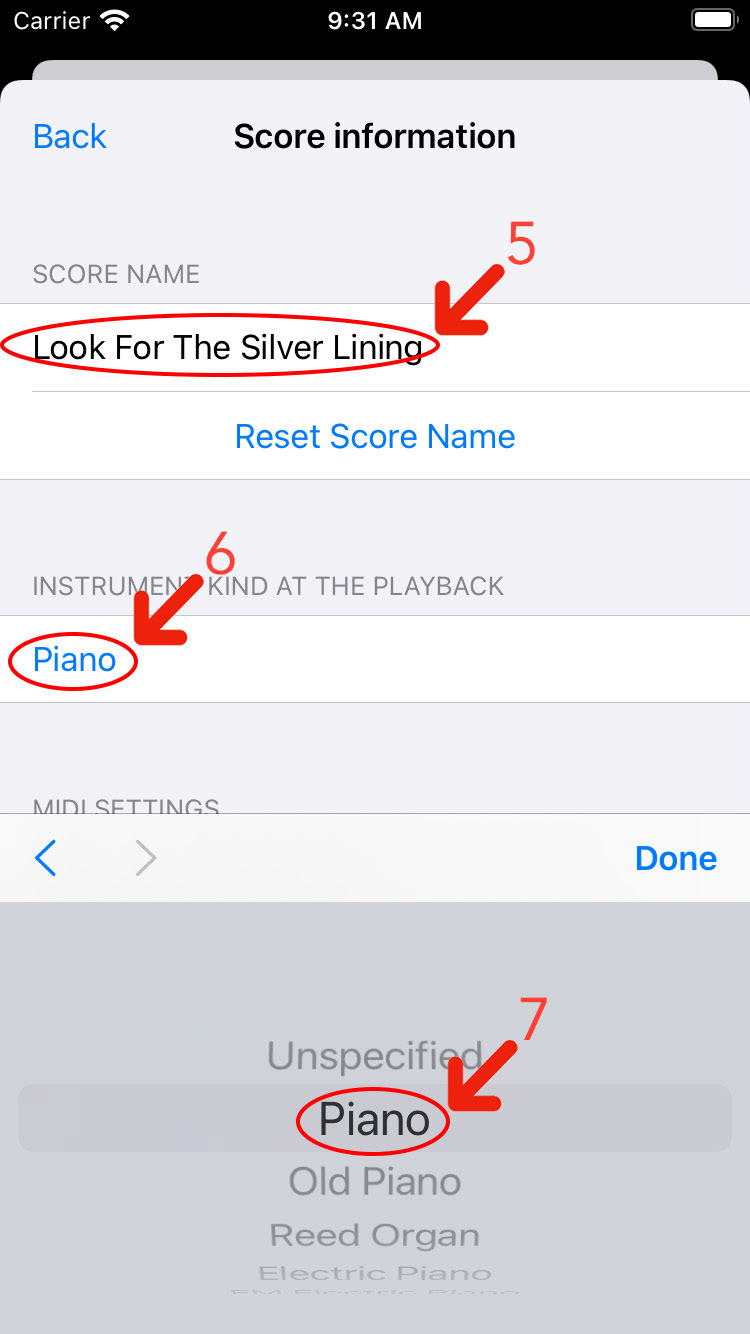
18.楽譜選択ビューで楽譜のタイトルをタップすると楽譜の情報ビューが表示され、楽譜のタイトル(矢印5)の編集ができます。また再生時の楽器の種類(矢印6)をタップすると表示されるピッカー(矢印7)から、演奏楽器を選択することができます。
18. Tap the title of the score in the score selection view to display the score information view, where you can edit the title of the score (arrow 5). You can also select the instrument kind to play from the picker (arrow 7) that appears when you tap the instrument name (arrow 6) displayed under the instrument kind at the playback.
18. Tap the title of the score in the score selection view to display the score information view, where you can edit the title of the score (arrow 5). You can also select the instrument kind to play from the picker (arrow 7) that appears when you tap the instrument name (arrow 6) displayed under the instrument kind at the playback.
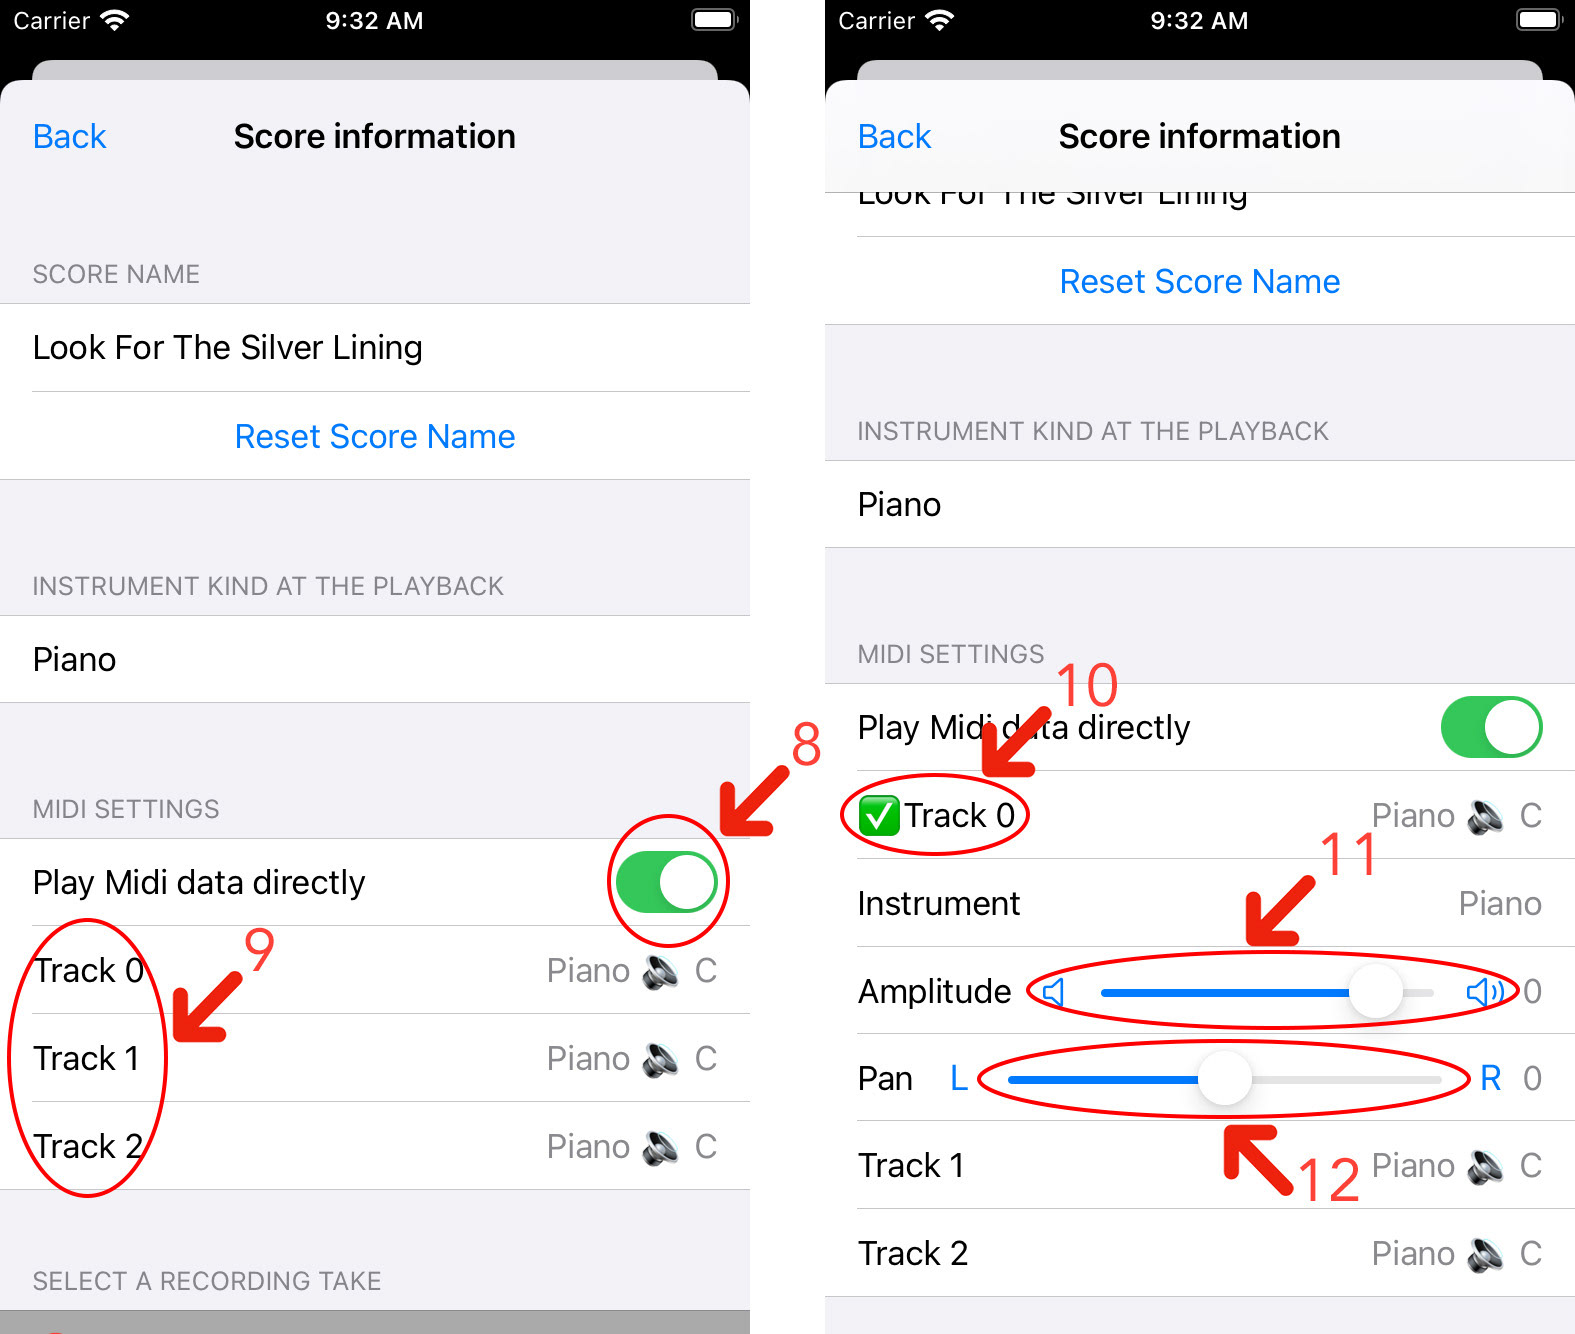
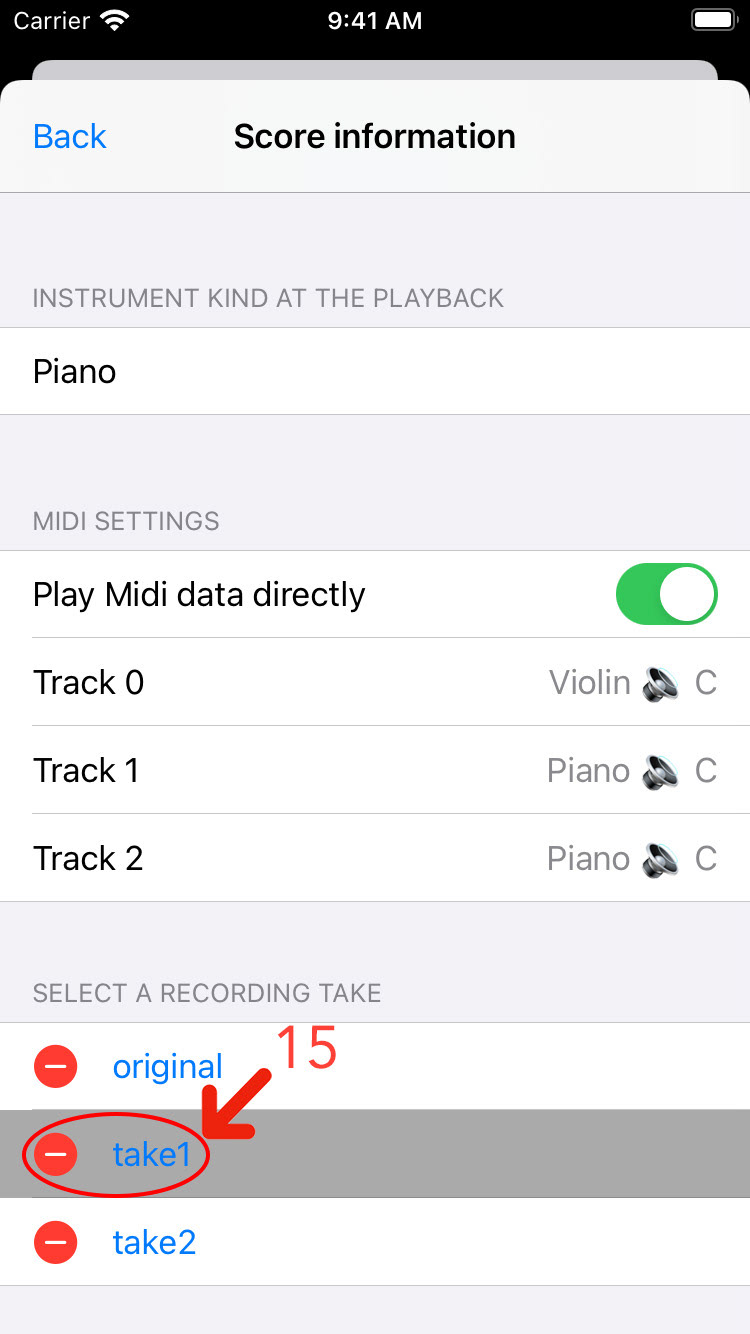
19.また同ビューの「MIDIデータを直接演奏する」ボタンをオンにする(矢印8)と、MIDIデータに記録されたトラック(矢印9)が表示されるので、各々のトラック名(矢印10)をタップして詳細を表示させて楽器の種類、音の振幅(矢印11)および音の位相(矢印12)を設定します。音の振幅のデフォルト値は0で、1刻みで-90から12の間で設定でき、値が小さいほど振幅(音量)は小さくなります。また音の位相のデフォルト値は0で、1刻みで-10から10の間で設定でき、ステレオスピーカーにおける対応する楽器の位置を指定します。0が中央で、値が小さいほど左に、大きいほど右に設定されます。デフォルト値に戻すにはそれぞれ音の振幅および音の位相のタイトルをタップしてください。
なおVersion1.1.2以前に読み込んだ楽譜はMIDIデータが保存されていないので、再度読み込んでください。
19.Also, turn on the "Play Midi data directly" button in the same view (arrow 8) to display the tracks recorded in the MIDI data (arrow 9), and tap each track name (arrow 10) to display details and set the instrument type, amplitude (arrow 11) and pan (arrow 12) of the sound. The default value of the amplitude is 0 and can be set between -90 and 12 in increments of 1, with smaller values resulting in lower amplitude. The default value for the pan is 0.0 and can be set from -10 to 10 in increments of 1, specifying the position of the corresponding instrument in the stereo speakers. 0.0 is the center, with smaller values set to the left and larger values to the right. To restore the default values, tap the sound amplitude and sound phase titles, respectively.
19.Also, turn on the "Play Midi data directly" button in the same view (arrow 8) to display the tracks recorded in the MIDI data (arrow 9), and tap each track name (arrow 10) to display details and set the instrument type, amplitude (arrow 11) and pan (arrow 12) of the sound. The default value of the amplitude is 0 and can be set between -90 and 12 in increments of 1, with smaller values resulting in lower amplitude. The default value for the pan is 0.0 and can be set from -10 to 10 in increments of 1, specifying the position of the corresponding instrument in the stereo speakers. 0.0 is the center, with smaller values set to the left and larger values to the right. To restore the default values, tap the sound amplitude and sound phase titles, respectively.
Please note that scores imported before Version 1.1.3 are not saved as MIDI data, so please import them again.
20.楽器の種類(矢印13)をタップすると表示されるピッカー(矢印14)から、各トラックに対応した演奏楽器を選択することができます。
20. Select the playing instrument for each track from the picker (arrow 14) that appears when you tap the instrument kind (arrow 13).
20. Select the playing instrument for each track from the picker (arrow 14) that appears when you tap the instrument kind (arrow 13).
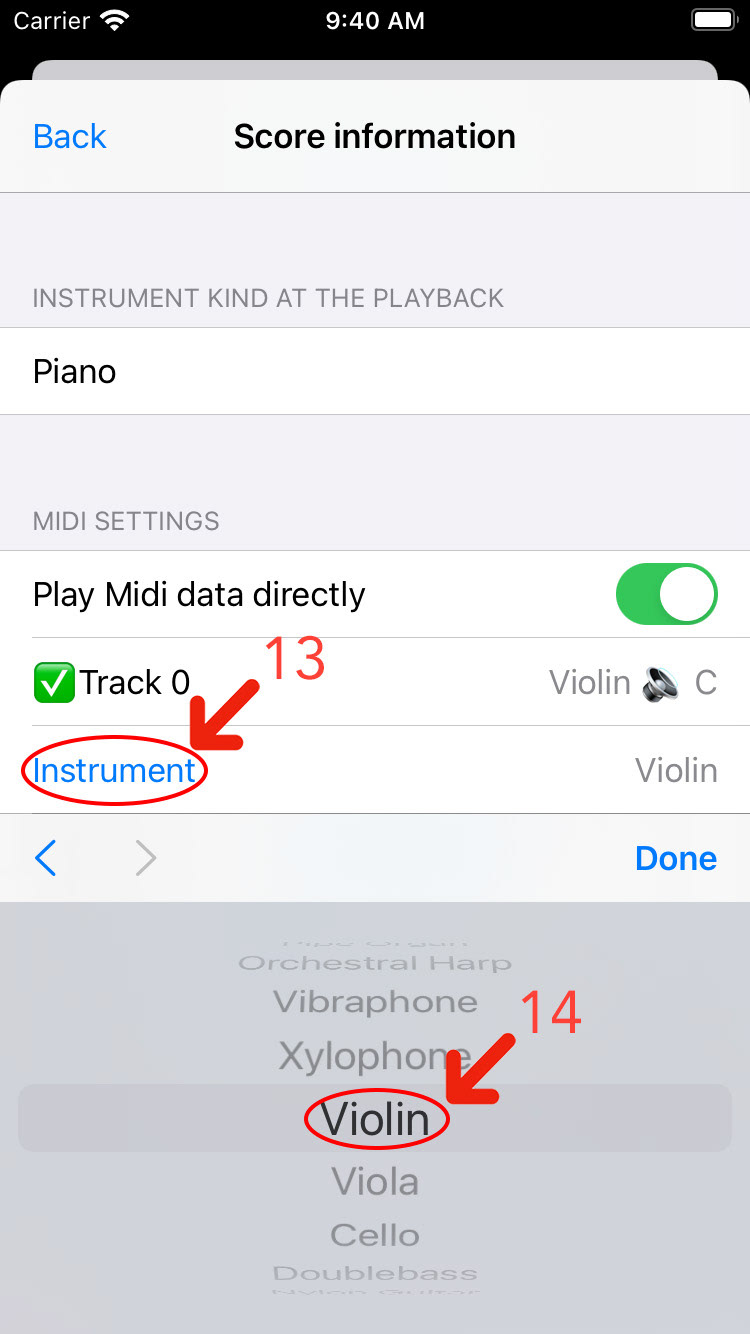
21.既に記録した演奏があれば、ここで選択したり削除する(矢印15)ことができます。
21. If you have already recorded performances, you can select or delete them here (arrow 15) .
21. If you have already recorded performances, you can select or delete them here (arrow 15) .
22.自動的に楽譜を再生するには通常の自動演奏モードに設定します。そのためには一度ホームビューに戻ってから設定ボタンをタップして設定ビューを表示し、「アンサンブルモード」スイッチをオフにして「戻る」ボタンをタップします。
22. To play the score automatically, set it to normal Auto Play mode. To do so, return to Home View, tap the Settings button to display the Settings View, turn off the Ensemble Mode switch, and tap the Back button.
ホームビューに戻ったら、アンサンブルモードを示すアイコンとアンサンブルを行うiPhoneの台数表示が消えていることを確認し、右側にあるモードボタンがジェスチャーモードであれば、タップして自動演奏モードに切り替えます。
When you return to the Home View, make sure that the icon indicating the ensemble mode and the number of iPhones in that mode are gone, and if the mode button on the right is in gesture mode, tap it to switch to Auto Play mode.
When you return to the Home View, make sure that the icon indicating the ensemble mode and the number of iPhones in that mode are gone, and if the mode button on the right is in gesture mode, tap it to switch to Auto Play mode.
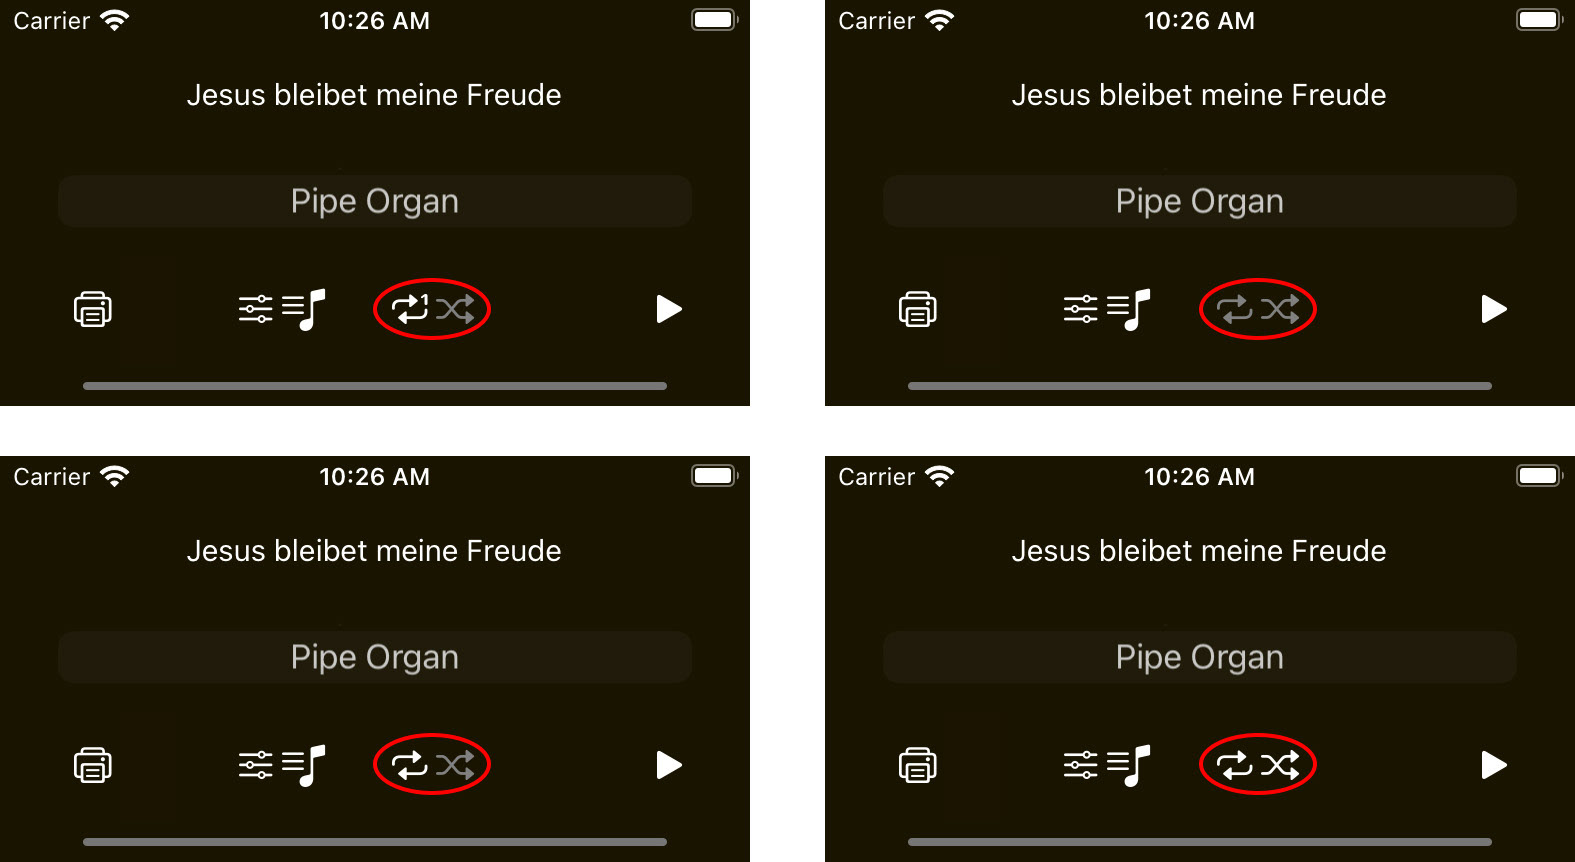
自動演奏のモードは演奏ボタンの左横にある繰り返しボタンとシャッフルボタンの繰り合わせにより切り替わります。自動演奏モードには、1曲の繰り返し、繰り返し無し、全曲をリスト順に繰り返し、全曲をシャッフルして繰り返しの4つがあります。1曲の繰り返しと全曲をリスト順に繰り返しの2つのモードはジェスチャー演奏モードでも有効です。
The Auto Play mode is changed by tapping the repeat button and the shuffle button located to the left of the play button. There are four automatic play modes: repeat one song, no repeat, repeat all songs in list order, and repeat all songs in shuffle order. The repeat one song and repeat all songs in list order modes are also available in gesture play mode.
23.自動演奏中に楽譜ビューの紫の演奏ライン上をダブルタップするとポーズ状態になります。このとき回転ジェスチャーをすると前後に演奏が進みます。
23. Double-tap on the purple play line in the score view during auto-play to pause. If you make a rotation gesture at this time, the performance will move forward and backward.
23. Double-tap on the purple play line in the score view during auto-play to pause. If you make a rotation gesture at this time, the performance will move forward and backward.
24.自動演奏中に楽譜ビューの紫の演奏ラインの下をダブルタップすると2秒分の早送り演奏をします。同様にラインの上をダブルタップすると2秒分の早戻し演奏をします。また早送り演奏中にビュー上で長押しをすると楽譜の最後まで移動します。同様に早戻し演奏中に長押しをすると楽譜の最初まで移動します。
24. Double-tap below the purple line in the score view during auto-play to perform 2 seconds fast-forward play. Similarly, double-tap above the line to perform 2 seconds rewind play. If you press and hold on the view while playing fast forward, you will move to the end of the score. Similarly, if you press and hold on the view while playing rewind, you will move to the beginning of the score.
24. Double-tap below the purple line in the score view during auto-play to perform 2 seconds fast-forward play. Similarly, double-tap above the line to perform 2 seconds rewind play. If you press and hold on the view while playing fast forward, you will move to the end of the score. Similarly, if you press and hold on the view while playing rewind, you will move to the beginning of the score.
25.自動演奏中に楽譜ビューの紫の演奏ラインの下を長押しすると3段階に演奏速度を早くできます。また演奏ラインの上を長押しすると3段階に演奏速度を遅くできます。元の演奏速度に戻すには、演奏ライン上を長押しします。
25. Press and hold below the purple play line in the score view to increase the playing speed in three steps. Press and hold above the line to slow down the performance speed in three steps. To return to the original playing speed, press and hold on the line.
26.「カメラを使う機能」を購入すると本体のカメラで楽譜を読み込んで手回し演奏ができるようなります。紙送りには40mm幅のロール紙やディスク型の楽譜を利用する手回しオルゴールが使えます。
26. If you purchase the "Using the Camera" feature, you can use the camera to read the music score and play them by hand. You can use a hand-cranked music box that uses 40mm wide rolls of paper or disc-type sheet music for paper feeding.
(注)「カメラを使う機能」を購入してもカメラが使えない場合には「設定」→「プライバシーとセキュリティ」→「カメラ」から「Roll Player Piano」をONにし、「設定」→「Roll Player Piano」の「カメラ」がONになっていることを確認しててください。
(Note) If you cannot use the camera even after purchasing the "Using the Camera" function, please go to "Settings" > "Privacy and Security" > "Camera" and turn on "Roll Player Piano", then go to "Settings" > "Roll Player Piano" and make sure the "Camera" is turned on.
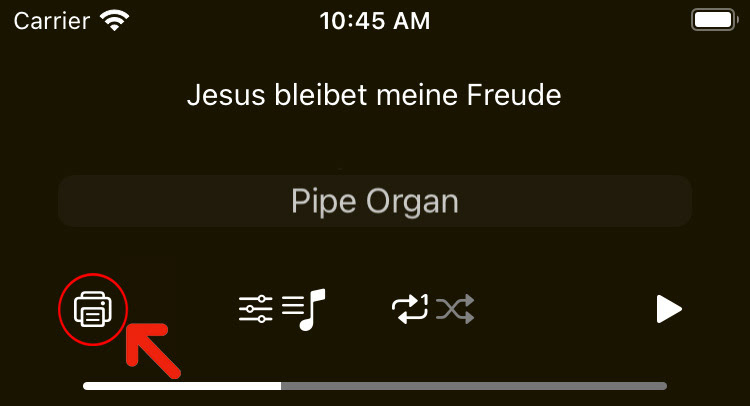
27.また同機能の購入により演奏用の楽譜をプリントできるようになります。画用紙等に印刷した楽譜は切り取り線に沿って切り取り、またロールの場合には切り取った楽譜をセロテープで繋いで紙送り装置にセットして、手回しすることにより演奏が可能です。
楽譜をプリントするにはジェスチャーモードあるいは自動演奏モードに切り替えて、プリントボタンをタップして下さい。
27. If you purchase this function, you will be able to print the music score for your performance. The printed music score can be cut along the cut line, or in the case of rolls, the cut sheet score can be connected with cellophane tape, placed in the paper feeder, and hand-cranked to play.
To print a score, switch to gesture play mode or Auto Play mode and tap the print button.
28.楽譜の種類、用紙サイズ、用紙の方向などを設定し「PDFの作成とプリント」ボタンを押すと、PDFが作成されAirPrintのプリントビューが表示されるので、プリンターを選択してプリントして下さい。連続音符の短縮長はそのままで構いません。
28. Set the media type, paper size, paper orientation, etc., and click the "Create and print PDF" button to create the PDF and display the AirPrint print view. Select a printer and print. You can leave the shortening length as they are.

29.印刷から演奏までの手順が以下の動画によりまとめられています。
29. The following video summarizes the procedure from printing to performance.
29. The following video summarizes the procedure from printing to performance.
30.指揮者モードによる演奏
既に、「MIDIフィアイルの読み込み機能」および「カメラを使う機能」を購入された方は、前面カメラを使った指揮者モードによる演奏が可能です。そのためにはまずホームビューに戻って設定ボタンをタップして設定ビューを表示し、「カメラによるジェスチャー」スイッチをオンにして「戻る」ボタンをタップしてホームビューに戻ります。次にファイル名をタップすると楽譜の選択ビューが表示されるので、17で説明したように編集ボタンをタップして編集モードに入り、更に演奏したいタイトルをタップすると楽譜情報ビューが表示されるので、19で説明したように「MIDIデータを直接演奏する」ボタンをオンして「戻る」ボタンをタップして楽譜の選択ビューに戻り、演奏したい楽譜が選択されていることを確認した上で「戻る」ボタンをタップしてホーム画面に戻ります。
30. Performance in Conductor Mode
If you have already purchased the "MIDI file import" and "Using the Camera" features, you can use the front camera to perform in conductor mode. To do so, first go back to Home View, tap the Settings button to display the Settings View, turn on the "Camera gesture" switch, and tap the "Back" button to return to the Home View. Next, tap the file name to display the score selection view, then tap the Edit button to enter edit mode as described in 17, and tap the title you want to play to display the score information view. Turn on the "Play Midi data directly" button as described in 19, tap the "Back" button to return to the score selection view, confirm that the score you want to play is selected, and then tap the "Back" button to return to the home view.
31.演奏ボタンをタップすると楽譜画面の中央に赤いクロス(X)が表示され、これはフロントカメラで撮影したあなたの人差し指の動きを表しています。また同時に楽譜画面の左下にいくつかの音符が表示され、これ人差し指の動きが「上から下へ」から「下から上へ」と変わったタイミングでカウントダウンしていきます。従って4拍子の曲であれば4つの音符が表示された時に1拍目となるように指揮をすれば、一般的な指揮の動作と違和感なく楽譜が演奏されます。
なお、何らかの理由により指揮をしてもうまく演奏が進まない場合には、楽譜画面の中央あたりをダブルタップすることにより一度指揮者モードをリセットしてみてください。
Tap the Play button, and you will see a red cross (X) in the center of the score view, which represents the movement of your index finger as captured by the front camera. At the same time, some notes are displayed in the lower left corner of the score view, which counts down as your index finger moves from "up to down" to "down to up". Therefore, in a four-beat score, conducting should be done so that the first beat is when the four notes are displayed, and the score will be played without any discrepancies with the general conducting motions.
If for some reason the performance does not progress well when conducting, try resetting the conductor mode by double-tapping the center of the score view.